Password is a powerful method to authenticate a user. Although with the modernization, we have many other ways to authenticate a user, such as Pin verification, Fingerprint sensor, Microsoft Hello, etc.
Top Rated Budget Laptops
Last update on 2025-03-30 / Affiliate links / Images from Amazon Product Advertising API
Passwords are our first defense line against unauthorized access to any critical data or device. Our passwords must be unique and contain a certain length and complexity so that no one can easily guess them and gain unauthorized access to the computers.
But at times, this handy method becomes a curse, and we feel helpless once we forget the passphrase to log in to the system.
In this article, you will see how to deal with this situation and access the laptop without a password. Whatever methods we discuss in this article are legit and can be used in case of a complete lockdown. The manufacturer offers these methods to avoid the hassle of being locked out, as we sometimes experience in real life when we locked our self out, and our precious belongings are still in the room.
We can break the lock similar to the above situation, but we need to keep in mind that a legit user should only perform this activity.
Note: This procedure is Microsoft environment specific and will be valid on devices with Microsoft-based operating systems only.
Why do we need to access the Laptop without a password?
As we have already discussed, the password is the first line of defense we put on the Laptop to avoid any unauthorized activity. Now let’s explore various conditions in which we want to access our Laptops without a password. Some of the reasons are as follows:
- When we do not need to authenticate the system (as the system or its data is not crucial).
- When we forget the password, we want to break it.
- When we want to avoid the hassle of typing the password
- When we have configured other methods for authentications.
So, above are some conditions in which we would like to use a Laptop without password authentication.
Without wasting a single moment, let’s explore all the possibilities of accessing a Laptop without a password.
Procedure:
There are several ways of accessing a Laptop without a password, whether we want to access the laptop with another method or use a technique to break the existing password. In this article, we will try to discuss each one of them.
The most used methods for accessing a Laptop without a password are as follows:
- With the help of Command Prompt
- With the help of the Windows Boot disk
- With the help of Microsoft Account
- With the help of a fingerprint
- With the help of a factory reset
- With the help of third-party tools
All the methods mentioned above will provide the same. Now let’s explore the methods one by one:
Method # 1: With the help of Command Prompt
We can change the laptop’s password with the help of a command prompt; for this, we need to invoke the default administrator account. Let’s go with the following steps:
Step # 1:
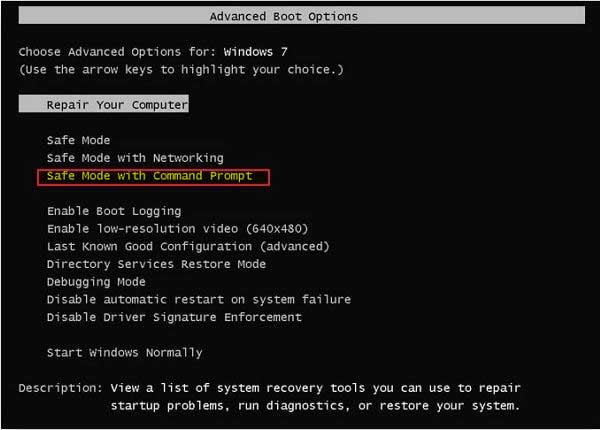
Restart the system and press F8
Step # 2:
Now select the “Safe mode with Command Prompt.”
Step # 3:
Now login with the hidden local admin account.
Step # 4:
Type “net user” username password. It will change the password for a user.
C:\> net user XYZ ABC (where XYZ is the username and ABC is the password).
With the above command, we can successfully reset the password for XYZ Account. But this method has a limitation as we must have the local administrator account enabled (which by default is disabled) to perform the above steps.
Method # 2: With the help of the Windows Boot Disk
If we want to access the laptop, we can do this with the help of a windows boot disk. Let’s go with the following steps:
Step # 1:
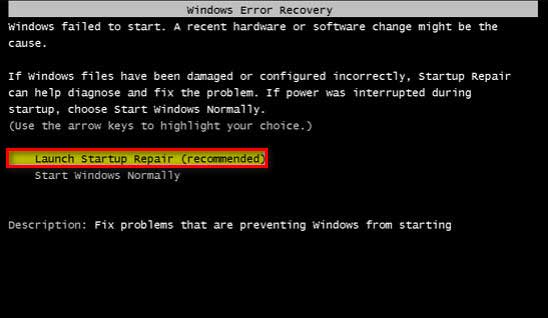
Start the system and abnormally shut it down; now restart it. This will generate boot options.
Step # 2:
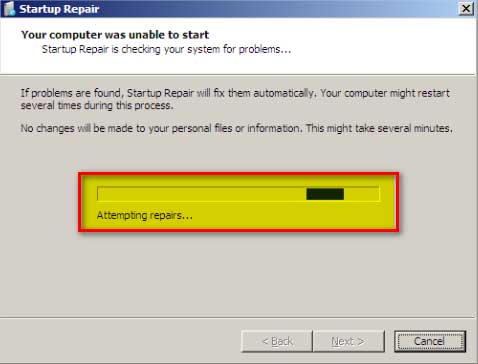
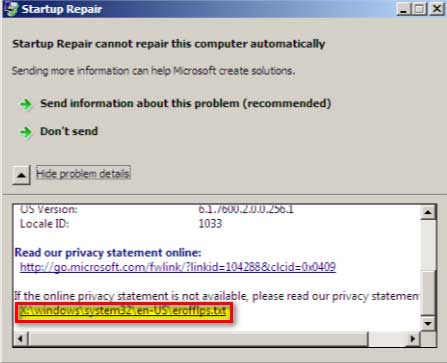
Now go to the “Start Up Repair”
Step # 3:
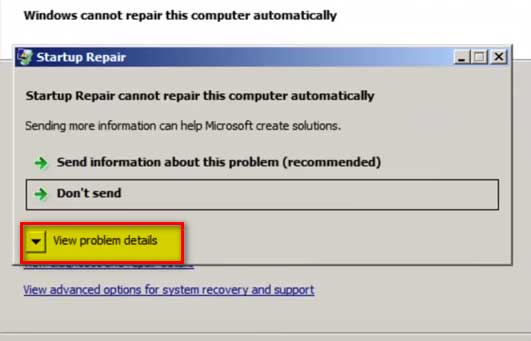
Windows will search for the problem and fail so we click on “View Problem details.”
Step # 4:
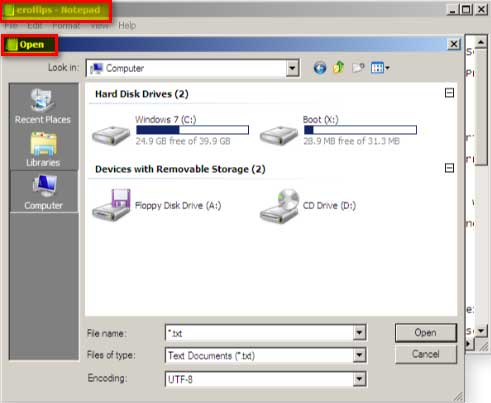
Scroll down and click on the last link. It will open a text file.
Step # 5:
At the top of the window click, File → Open. Navigate to the Windows\System32 folder
Step # 6:
Now, find a file named “sethc”. Rename this file.
Step # 7:
Now we will move to cmd.exe and create a copy of this file.
Step # 8:
Next, we need to rename the copied file as “sethc”.
Step # 9:
We will reboot the system, and at the login prompt, we will press the “Shift” key five times. It will launch the command prompt; the rest will be easy once we are in the command prompt.
Step # 10:
Now we will type the “net user” username password (like the previous method). This will change the password for a user.
C:\> net user XYZ ABC (where XYZ is the username and ABC is the password).
Step # 11:
Close the command prompt by typing “Exit,” and we are good to go.
Method # 3: With the help of a Microsoft Account
This method works with windows 8 or higher but can be a lifesaver. So, let’s explore the steps:
Step # 1:
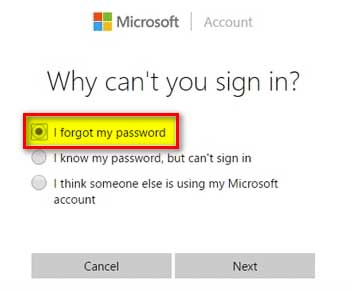
Go to the Microsoft login page
Step # 2:
Type the email id associated with the local account for which we want to change the password.
Step # 3:
Rather than entering the password press “I forgot my password”.
Step # 4:
This will ask us to choose the option to receive the security code.
Step # 5:
Now click the “Send Code” button.
Step # 6:
Once the code has been received enter it to the given box and click “Next”.
Step # 7:
Choose the new password, now the password has been reset.
Method # 4: With the help of the fingerprint option
It is a straightforward method to use the fingerprint option to open the laptop without entering the password, even if we forgot the password. For recovering the password or logging in on the laptop with this method, it is necessary to have the fingerprint option enabled.
If we have enabled this option, we do not need to worry about forgetting the password, all we need to do is scan our finger over the sensor, and we can instantly log in to the laptop.
Method # 5: With the help of Factory Reset
When none of the above methods is working, we can move towards the hard step of factory reset. For this following step needs to be taken: (we have taken the HP laptop example)
Step # 1:
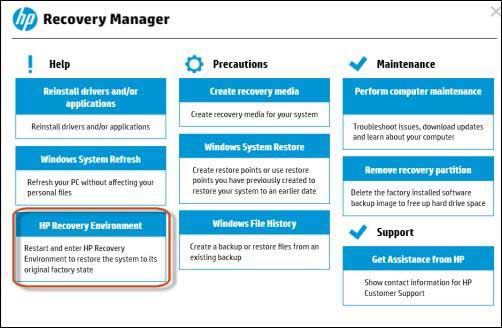
Restart the system and press “F11” to open the HP recovery manager
“OR”
- We can run the “HP recovery environment” from the Windows as well
Step # 2:
Now select “HP recovery environment”
Image credit: hp.com
Step # 3:
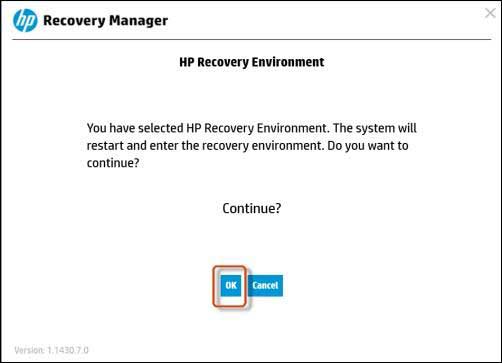
Now the system asks to restart to enter the “Recovery Environment”
Image credit: hp.com
Step # 4:
From here, select “System Recovery” and follow the wizard.
This method restores the system to its original factory state by deleting the partition and recreating it. A fresh installation of windows images and drivers then be deployed by the “HP Recovery Manager” built by the company itself. This method refreshes the windows and resets the password, or we can say it will bring the system to its original state, but limited HP models support this method.
We can perform the factory image restore method to reset the password on other laptops, such as Dell, Lenovo, etc. But the only condition is that they must have recovery environment support available.
Method # 6: With the help of Third-Party software
Some excellent password recovery software is available that makes our work easier by recovering the password without losing the data. Following is the software that can help us:
- Hiren’s Boot CD
- Winsenior
- iSunshare’s Windows Password Genius
All the programs mentioned above can reset the password and help us access the laptop without a password. Although these programs are excellent in their work, some people are still not comfortable running the third-party tools over the system.
Closing Statement:
In this article, we have tried to cover all the aspects and methods that will help us access the Laptop without a password. All the methods are straightforward and require not too much technical knowledge. Remember, this article is written explicitly for Windows-based Laptops or Computers.
All the methods mentioned in this article can fit for purpose, but we suggest you go with Method 5, and Method 6 as both the ways have very few limitations, and their success rate is much higher than other procedures.
References:
- How to Unlock My Laptop without Reset Disk If Forgot Password (isumsoft.com)l
- How to Get Into Laptop without Password in Windows 10/8/7/XP – Windows Password Key (winpasskey.com)
- [4 SOLUTIONS] How to Open Laptop without Password (imyfone.com)
- How to unlock a computer without the password (techadvisor.com)
- How to Recover or Reset Forgotten Windows Passwords | Avast
- Reset your Windows local account password (microsoft.com)
