
AirPods was launched in the year 2016 and since then they become the most popular accessory of Apple. Basically, AirPods are Bluetooth earbuds that not only play the audio but allow us to speak with the help of a built-in noise-canceling microphone.
As we all know that the Apple device communicates and sync with each other easily and quickly, and at the time it seems difficult to connect these devices with non-Apple hardware, but in the case of the Airpods, the new H1 chip makes it easy to connect AirPods with any other laptop like Windows-based Laptops.
What’s Inside
- 1 – Why do we need this?
- 2 – Method: Windows 10 Bluetooth connectivity
- 3 – Method: Apple AirPod pairing
- 4 – Method: Apple AirPod discovery in Windows 10 Laptop
- 5 – Method: Swift Pair (Alternative method of Pairing)
- 6 – Troubleshooting Steps: Apple AirPod discovery in Windows 10 Laptop
- 7 – Closing Statement:
Compatibility:
Thanks to the H1 chip which not only gives these earbuds the following capabilities
- Longer talk time
- Hands-free “Hey Siri” support
- Noise Cancellation
- Compatibility with other devices
Now the Apple AirPods are compatible with any device which has Bluetooth 4.0 and above support.
Today, we are going to see the procedures that how we can connect Bluetooth AirPods with Windows 10 based Laptops or on any other windows-based machine. But before moving on to the actual procedure we must understand the need for this whole activity.
Note: This procedure is Microsoft environment specific and will be valid on devices with Microsoft-based operating systems only.
Why do we need this?
As we have already discussed that Apple AirPods connect with Apple devices quickly but at times, we need to connect them with the other operating system-based devices because of the following reasons:
- We are quite comfortable with windows 10 PC.
- We have an Android-based phone.
- Our Macbook or iPhone broke down.
Although we have mentioned some reasons to connect Apple AirPods with non-Apple devices there are many other conditions due to which we need to connect Apple AirPods with Windows or other OS-based devices.
We need to understand that connecting AirPods with Windows 10 based laptops require some additional steps, which we are going to cover in this article. So, without wasting any time let’s see the procedure to connect Apple’s AirPod with Windows 10 based laptop.
Procedure:
AirPod’s connectivity with a Windows-based PC or Laptop requires some extra steps. In this article, we have tried to explain all the steps in a simple way. Let’s see the procedure below
Method: Windows 10 Bluetooth connectivity
Before starting to pair the Windows 10 laptop with Apple’s AirPods we must first turn on the Bluetooth on our windows 10 machine. For this we need to follow the following steps:
Step # 1:
Right Click on the “Start” button from here select “Settings”

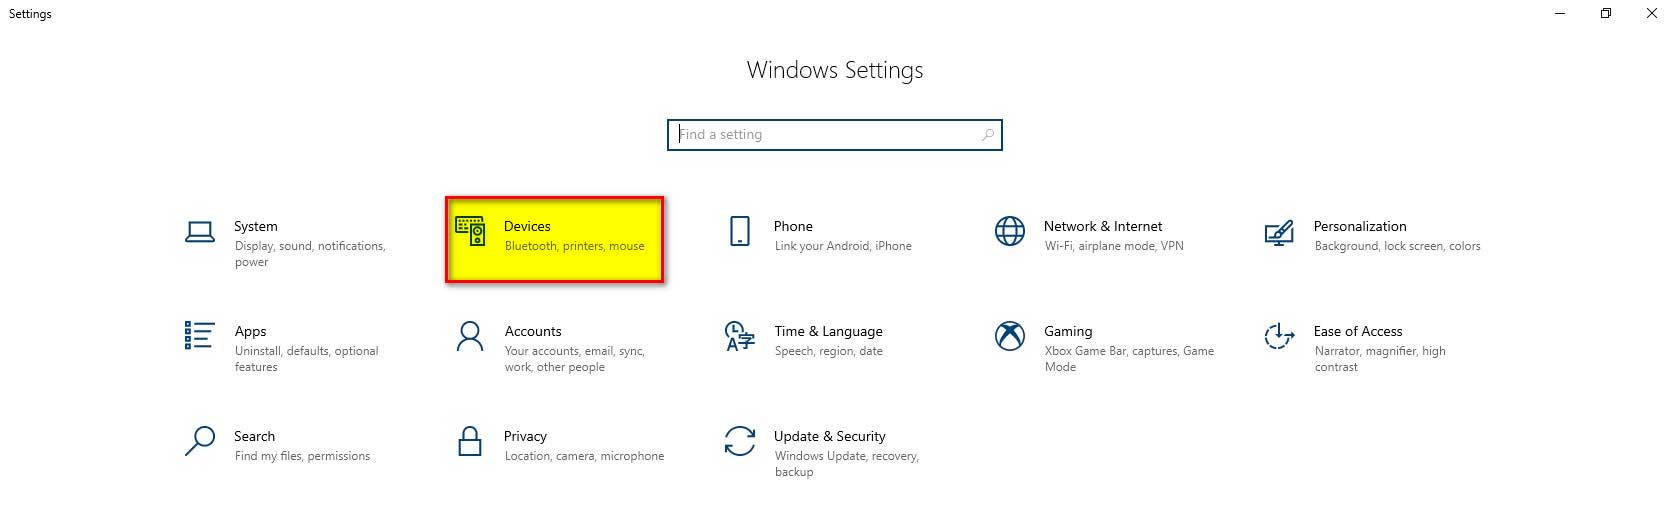
Step # 2:
Click the “Devices” option which will open a new window pops up

Step # 3:
On this window select “Bluetooth & other devices”
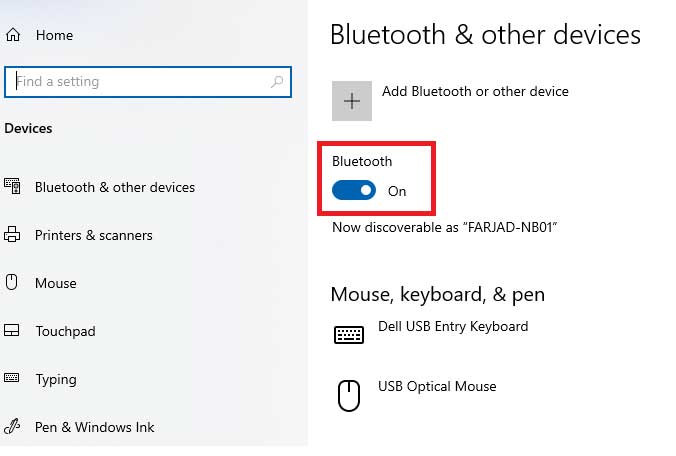
Step # 4:
From here turn on the Bluetooth by toggling the button “On”.
Alternative Way to Turn on the Bluetooth
We can open the Bluetooth on windows 10 machine by accessing the “Action Center” for this follow following steps:
Step # 1:
Go to the bottom right of the screen and click on the “Speech Bubble” icon

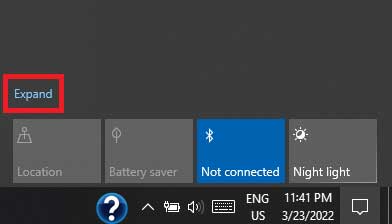
Step # 2:
Now if there is no Bluetooth option is available then press “Expand”.
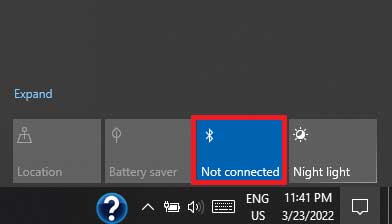
Step # 3:
Here we find a “Bluetooth” icon we just need to toggle it on.
Step # 4:
If the background of the “Bluetooth” icon becomes blue, then it is on.
Note:
“Bluetooth icon” will only be visible to us if the system founda “Bluetooth adapter”.
Method: Apple AirPod pairing
Now as we have turned on the Bluetooth option in our Windows 10 based PC, the next step is to put the Apple AirPods in pairing mode, so that it becomes discoverable in Windows 10. For this we will follow the below steps:
Step # 1:
To pair the Apple AirPods, open the lid up of the AirPod case
Step # 2:
We must make sure that Airpods are in the case
Step # 3:
Now press and hold the button on “Apple AirPod’s” case while the earbuds are still in the case.
Step # 4:
The light on the “Apple AirPod’s” case becomes white. This is the indication that “Apple AirPods” is now in pairing mode.
Method: Apple AirPod discovery in Windows 10 Laptop
Now, as we have put the Apple AirPods in pairing mode, the next step is to find it in the Windows 10 Laptop for establishing a pair between the two devices. For this we will follow the below steps:
Step # 1:
Go to “Bluetooth and Other devices” by pressing the “Start” button and selecting “Settings”
Step # 2:
Click the “Devices” option
Step # 3:
This will open a new window
Step # 4:
From here select “Bluetooth & other devices”
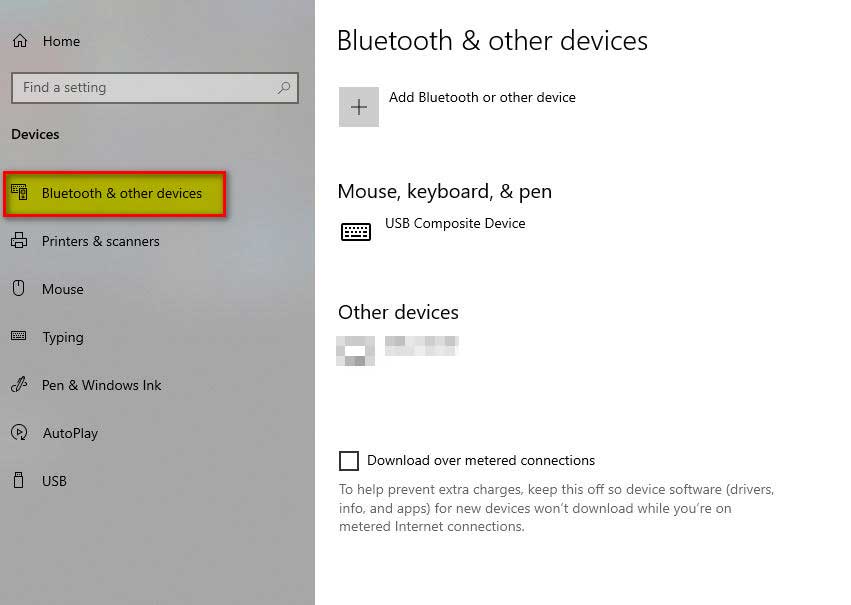
Step # 5:
Now we will find our device here. But if the device is not listed here, we have to perform some more steps.
Step # 6:
Click “Add Bluetooth & other devices”
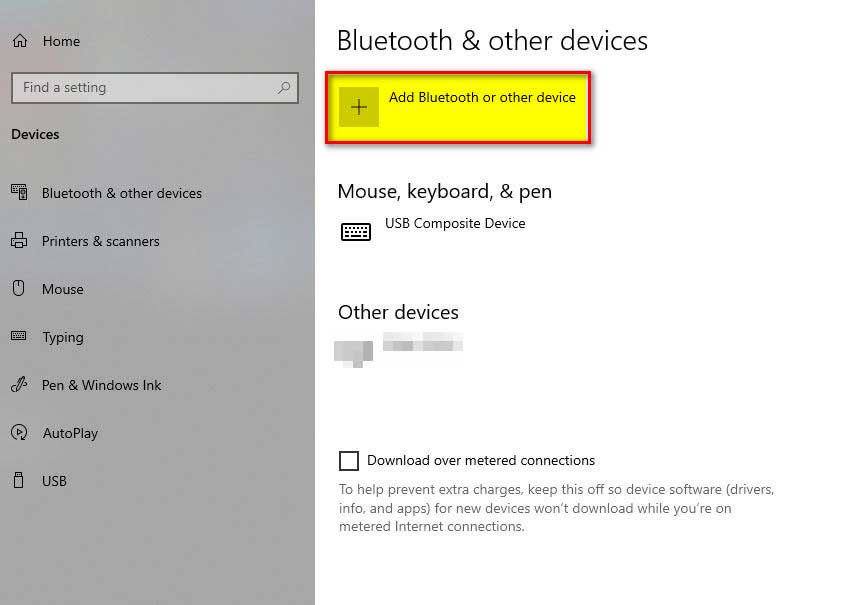
Step # 7:
A new pop up window of “Add device” will open
Step # 8:
Select “Bluetooth” from here
Step # 9:
Now from here, we will choose our “Apple AirPods” which we have already put in the pairing mode.
Step # 10:
If there is any other additional instruction, we will follow that otherwise we need to press the “Done” button.
If everything goes right, we have paired the Apple AirPod with the Windows 10 PC successfully.
Method: Swift Pair (Alternative method of Pairing)
Windows 10 makes our lives a lot easier than we think. Connecting with Bluetooth and pairing with new devices becomes a hassle at times, so we do not need to worry about it, Microsoft addressed this issue in Windows 10 (version 1803) which was released in April 2018.
In version 1803 Microsoft introduced a swift pairing option which helps us undergo several steps again and again while connecting new Bluetooth devices. Once this option is enabled, we just need to bring the Bluetooth device near to the Windows 10 Laptop and Windows 10 will show us a popup of a new Bluetooth device found (which can be anything a Bluetooth mouse, keyboard, or Apple’s AirPods).
Let’s see the steps to turn on this feature:
Step # 1:
Now press the “Start” button from here select “Settings”
Step # 2:
Click the “Devices” option which will open a new window pops up
Step # 3:
On this window select “Bluetooth & other devices”
Step # 4:
Now check the “Show notifications to connect using Swift Pair”. This will turn on the swift pair notification on Windows 10 Laptop.
Once we are done enabling the Swift Pair on Windows 10 Laptop. We will try to pair the Apple AirPods with it.
Step # 5:
Enabling the pairing on Apple AirPods will remain the same
Step # 6:
Now we will get the Apple AirPods closer to the Windows 10 Laptop
Step # 7:
We will see a pop-up window showing message “New Bluetooth AirPods found” or “New Bluetooth device found”
Step # 8:
Now we just need to press the “Connect” button and Kaboommm! the Apple AirPods connected with the Windows 10 Laptop.
Troubleshooting Steps: Apple AirPod discovery in Windows 10 Laptop
In this article, we have seen the Apple AirPod connectivity with Windows 10 Laptop which is pretty straightforward and easy to perform the procedure. But at times these simple and straightforward steps become a hassle, so let’s discuss our course of action in case of connectivity issues.
In case of connectivity issues, we will troubleshoot the process in the following steps:
- AirPod not selected as audio output: First thing First, in case we are unable to hear any sound out of our AirPod we need to check the application that AirPod’s are selected as the audio output device.
- Software is the culprit: At times it is not the AirPods that misbehave, the culprit might be the windows app on which we are using AirPods as the output device. So, the recommendation is to close the app and reopen it.
- Outdated Bluetooth driver: We can face connectivity issues because of a number of reasons and an outdated Bluetooth driver is one of them, so the solution is to update the Bluetooth driver on a Windows 10 Laptop.
- Bluetooth Adapter issue: At times the Bluetooth adapter is the one behaving fishy. So, we need to check it and repair it. The easiest way of checking is to connect another device with the Windows 10 Laptop and if it is also not connecting then we must take our Laptop to the service center for repairing the Bluetooth Adapter.
- Pairing is not enabled on AirPod: While troubleshooting the connectivity issues with Windows 10 Laptop and Apple AirPod, we must try another way around as well. This means that check whether AirPods is in pairing mode or not. We can do this by checking the white light on the AirPod’s case, if the light is not flashing on the case this means that the AirPods are not in pairing mode. We need to press and hold the button on the case to repair them.
Closing Statement:
In this article, we have tried to cover all the nitty-gritty of connecting Bluetooth Apple AirPods with Windows 10 laptops. We have also tried to explain every step in as simple language as we can. Hope you will find this article informative and easy to understand.
References:
- How to connect your AirPods to a computer – Tech (mashable.com)
- AirPods – Wikipedia
- How to Pair and Connect Apple AirPods to a Windows PC (businessinsider.com)
- How to Connect AirPods to a Windows 10 PC (lifewire.com)
- How to pair Apple AirPods with your Windows 10 PC in one minute – CNET