
Using iPhone is common these days as it is quite popular among users worldwide due to its brand loyalty, ease of use, reliability, etc. Nowadays, all the mobiles are used to take pictures and shoot videos due to their built-in camera facility.
Once we have personal data on our phones, it becomes our necessity to take its backup on the much larger storage either over Laptops or on external drives. These backups can be taken on MacBooks, but what if we have windows machine with us?
As it is quite simple to backup an iPhone over Mac, but in case of taking backup on a Windows PC or Laptop requires a little effort.
In this article, we will see how to transfer photos or any other data from iPhone to Laptop. But before we move on to the procedure, we need to understand why we need to perform the backups on windows machines or Laptops.
Note: This procedure is Microsoft environment specific and will be valid on devices with Microsoft-based operating systems only.
What’s Inside
- 1 – Why do we need to take a backup of the iPhone?
- 2 – Method # 1: Transferring photos via Windows Photo Application
- 3 – Method # 2: Transfer of photos by detecting iPhone as Mass Storage
- 4 – Method # 3: Transferring the photos from iPhone to PC via Bluetooth
- 5 – Method # 4: Transfer photos from iPhone to Laptop via iCloud
- 6 – Method # 5: Transfer photos from iPhone to Laptop via iTunes
- 7 – Closing Statement:
Why do we need to take a backup of the iPhone?

As we have already discussed, the iPhone is a commonly used gadget that has our daily data, pictures, videos, etc. Now let’s explore various conditions in which we need to take backup of our iPhone on a Laptop. Some of the reasons are as follows:
- To save our data on larger storage.
- For viewing pictures on a larger screen
- For printing purposes
- For File Sharing.
- For transferring our photos to the external storage (external HDD, etc.).
So, above are some conditions in which we need to transfer our photos and other data from iPhone to Laptop either (MacBook or Windows).
Without wasting a single moment let’s explore all the possibilities of transferring photos and other data from iPhone to Laptop.
Procedure:
There are several ways to backup the data or transfer the data from iPhone to a Laptop. In this article, we will try to discuss each one of them.
The most used methods for transferring iPhone photos to Laptop are as follows:
- Transfer of photos via Windows Photo Application
- Transfer of Photos from iPhone by detecting it as a mass storage device
- Transferring the photos from iPhone to Laptop via Bluetooth
- Transfer of Photos from iPhone to Laptop with the help of iCloud
- Transfer of Photos from iPhone to Laptop with the help of iTunes
All the methods mentioned above will provide the same result, which means these will help us transfer the data from iPhone to Laptop. Now let’s explore the methods one by one:
Method # 1: Transferring photos via Windows Photo Application
Transferring photos from iPhone to a laptop with windows 10 photo application. Let’s go with the following steps:
Step # 1:
Connect the iPhone with the Windows 10 laptop via USB cable.
Step # 2:
There is a notification that appears on the iPhone screen whether we want to allow the computer to access the iPhone. Here we press “Allow”
Step # 3:
Now move on to the Laptop where windows 10 launched the Windows Photo Application automatically. If there is no such window that appears then we can go to search and open the photo application manually.
Step # 4:
After opening the photo application, we need to click the “Import” button in the upper right corner of the photo application.
Step # 5:
Now from here select the drop-down menu and click on “From a USB device”. If there are multiple USB devices available, then we specifically select our iPhone.
Step # 6:
Now the Laptop will search the iPhone for photos to import.
Step # 7:
Once the search completes then a pop-up box will appear from where we can select all the photos which we want to import.
Step # 8:
But before moving any further we need to see the location where our photos going to be imported. For this click on the “Settings” icon as shown a “gear” in the upper right corner.
Step # 9:
From here we can select and change the import destination of the files now click “Done”.
Step # 10:
Now we will select the images which we want to transfer after which press “Import”.
Step # 11:
Once the processing is complete, then all the photos have been imported into the windows Laptop.
Method # 2: Transfer of photos by detecting iPhone as Mass Storage
In the above method, if the Windows App crashes while importing the photos, then we do not need to worry about it as it is a common error which appears out of blue. We have an alternative way of importing the photos from iPhone to Windows, which is as follows:
Step # 1:
Connect the iPhone with the Windows 10 laptop via USB cable.
Step # 2:
There is a notification that appears on the iPhone screen whether we want to allow the computer to access the iPhone. Here we press “Allow”
Step # 3:
Now we will move on to the Windows Laptop and navigate to “This PC” here, we will see our iPhone listed under “Devices and Drives”.
Step # 4:
Now we will right-click on the iPhone icon and click “Import pictures and videos”.
Step # 5:
From here, we can import all the items or review them as per our desire.
Step # 6:
If we want to change the location of imported files, we can click on the “More options” button.
Step # 7:
Now click the “Next” button, after which the computer searches the iPhone for images and videos.
Step # 8:
Once it is done with the searching, then all of them have been displayed in a grouped form.
Step # 9:
All we need to do is to press the “Next” button, and the computer starts importing the files.
Method # 3: Transferring the photos from iPhone to PC via Bluetooth
Another way of transferring the photos from iPhone to PC is with the help of Bluetooth. So, let’s explore the steps:
Step # 1:
Go to the “Settings” on the iPhone and enable “Bluetooth”
Step # 2:
Now let’s move on to the computer and open Bluetooth.
Step # 3:
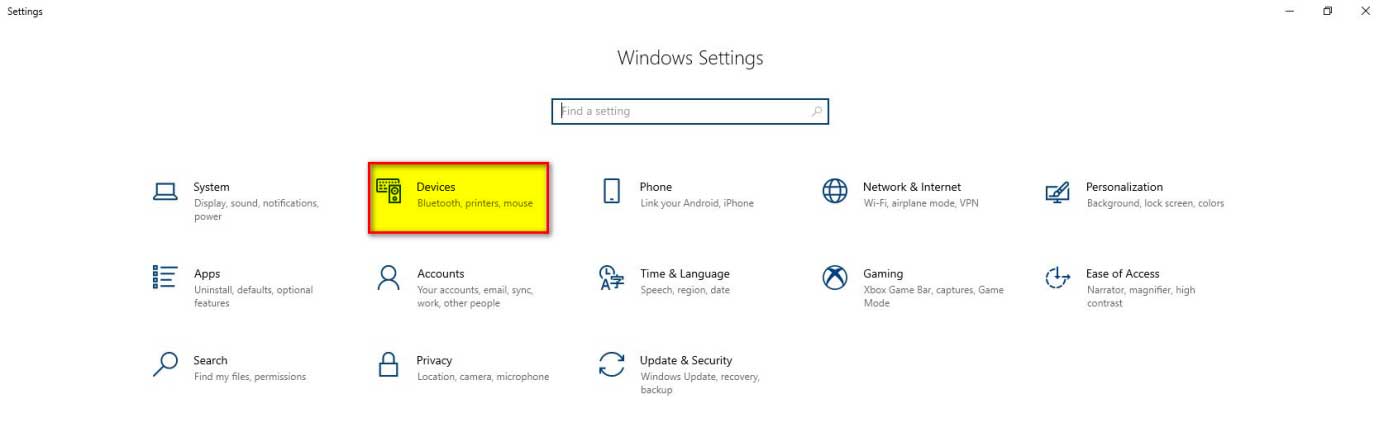
Right Click on the “Start” button from here, select “Settings”

Step # 4:
Click the “Devices” option which will open a new window that pops up
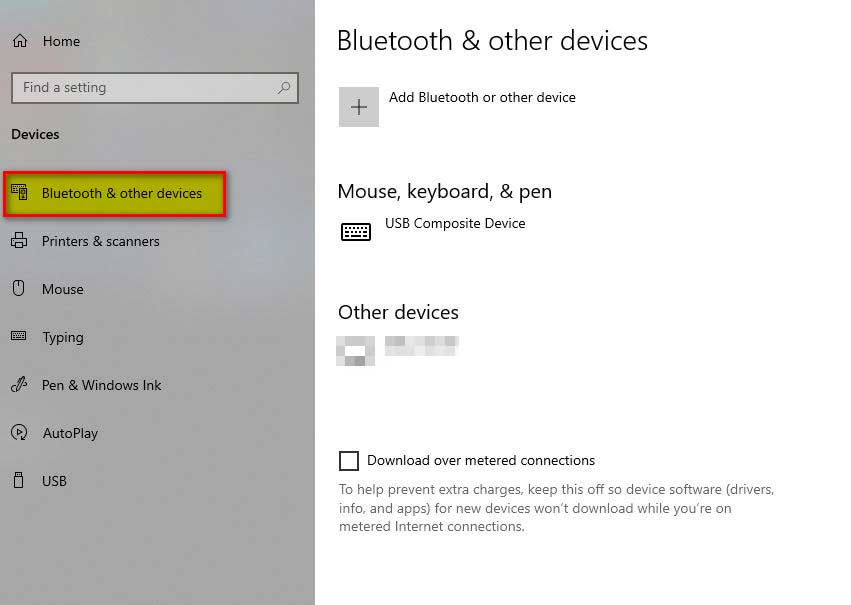
Step # 5:
On this window, select “Bluetooth & other devices.”
Step # 6:
From here, turn on the Bluetooth by toggling the button “On”.

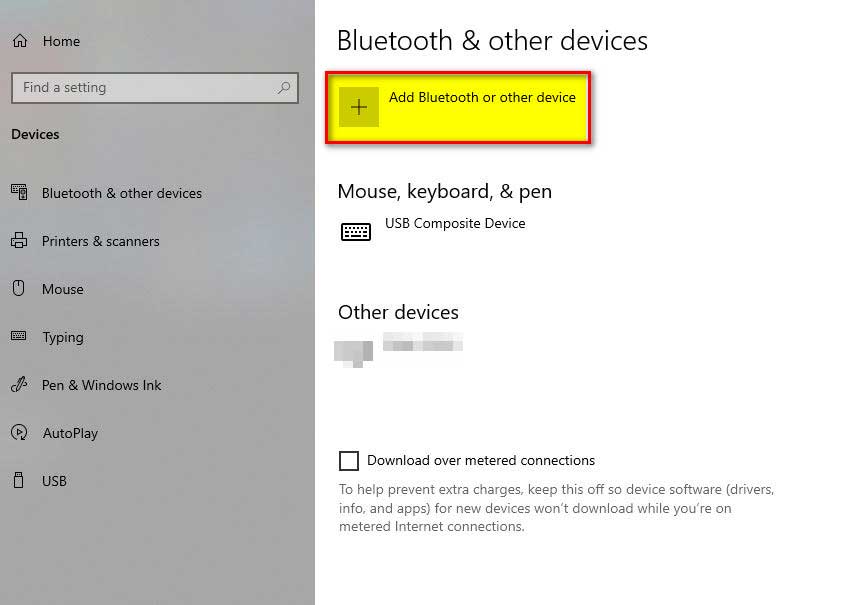
Step # 7:
Click “Add Bluetooth & other devices.”
Step # 8:
A new pop-up window of “Add device” will open
Step # 8:
Select “Bluetooth” from here
Step # 9:
Now from here, we will choose our “Apple iPhone” to pair. Once done, we will get an authorization code that could allow us to transfer photos.
Step # 10:
Once the authentication is completed, we will move on to the photos app for iPhone and select the photos to transfer to the Windows Laptop.
Method # 4: Transfer photos from iPhone to Laptop via iCloud
Apple has provided us with another way to store and transfer photos to any device. iCloud is a sophisticated way to transfer photos and data over the windows 10 laptop. Following are the steps which we use:
Step # 1:
Turn on the iCloud setup over the iPhone and sync photos with the help of Apple id.
Step # 2:
Now on a windows laptop, download “iCloud for Windows.”
Step # 3:
After this, open the iCloud for Windows application and sign in with the same Apple id.
Step # 4:
From here, select options next to “Photos”.
Step # 5:
From here, select iCloud photos and click “Done”.
Step # 6:
If all the steps go right, we can successfully transfer the photos from our iPhone to iCloud and from iCloud to Windows 10 Laptop.
Method # 5: Transfer photos from iPhone to Laptop via iTunes
Apple iTunes provides another way to transfer the photos from iPhone to the laptop swiftly. For this we need to follow the below steps:
Step # 1:
Download the latest version of iTunes and launch it.
Step # 2:
Now connect the Apple iPhone with Laptop via USB cable.
Step # 3:
Now click on our iPhone on the top left corner of iTunes.
Step # 4:
Look for the photos in the left pane of iTunes.
Step # 5:
Now while selecting the photos move on to the right pane and select the check box next to “Sync Photos”.
Step # 6:
From here, we will choose “Sync all Photos and albums,” or we can select “include videos”.
Step # 7:
Now move on to the windows Laptop and open the Photos app.
Step # 8:
From here, select Import ® from a USB device.
Step # 9:
We will select our iPhone and follow the instruction as we have done in previous sections.
Step # 10:
After completing the above steps, we are done with syncing the photos or taking iPhone backup to the Windows laptop.
Closing Statement:
In this article, we have tried to cover all the methods that will help us in transferring the photos from iPhone to a Laptop. All the methods are straightforward and required not too much technical knowledge. Although this article is specifically written for Windows-based Laptops or Computers.
Hope the readers find this article interesting, Informative, and engaging.
References:
- 3 Ways to Transfer Photos from iPhone to Laptop (Win&Mac)- Dr.Fone (wondershare.com)
- Import photos and videos from an iPhone to PC (microsoft.com)
- Transfer photos and videos from your iPhone, iPad, or iPod touch to your Mac or PC – Apple Support
- How to Transfer Photos from iPhone to PC Using iTunes (imyfone.com)
- 6 Easy Ways to Transfer Photos from iPhone to PC or Mac (2022) (iphonelife.com)