
Laptops play an essential role in our life. These gadgets travel with us everywhere, from our home to our office, from a park to a university library. Because of its usability, it contains a lot amount of essential data.
Apart from the data laptop gives us the ease of access to work from anywhere. But when this useful gadget starts creating issues such as sluggish behavior, hanging problem, or any hardware failure, then it becomes frustrating.
Here a question arises as to why a laptop behaves sluggishly or starts hanging. This question is not as simple as it seems to be because knowing an exact issue is quite tricky. But the common cause of a laptop creating problems is over time, the equipment becomes rusty and generates the heat due to which it generates issues.
Along with the equipment, an operating system is also equally involved in creating issues as with the time it gets updated, and we put a lot of pressure on it.
Regarding hardware failure, the most common issues occurred in the hard drives, CPU, GPU, RAMs, Screen, and Batteries. If we talk about operating systems’ problems are viruses, storage capacity exhaustion, slow operating system performance, software or app crashes, etc.
The best way to prevent these conditions is to regularly check the laptop’s health concerning both hardware and software.
In this article, we will discuss different methods to diagnose or check the health of the laptops (Hp laptops, Dell laptops, etc.) concerning hardware and software issues.
Note: This procedure is Microsoft environment specific and will be valid on devices with Microsoft-based operating systems only.
Before moving on any further, let’s investigate why we need to perform a diagnostic on HP laptops, Dell laptops, etc.
Why do we need to run the diagnostic on laptop?
As we have already discussed, the importance of laptops and their issues occur over time. So, there are various conditions in which we must run a proper diagnostic over the laptop to prevent any issue. Some of the reasons are as follows:
- When we want to proactively diagnose the issue.
- When hardware creates issues
- When the laptop got infected with the virus
- When the laptop behaves abnormally
- When a hardware failure
- When the operating system behaves sluggish
So, above are some conditions we need to run a diagnostic over the laptop.
Procedure:
We have several ways to run a diagnostic over the laptop. But the procedure depends on the nature of the issue, whether we want to run a diagnostic for any software problem or a hardware problem. The process of running the diagnostic also depends on the operating systems and brands of laptops. This article will discuss all the possible ways of running a diagnostic on laptops.
The most used methods for wiping out a system are as follows:
- With the help of a performance monitor
- With the help of the windows memory testing tool
- With the help of event viewer
- With the help of a battery diagnostic (command prompt or tool)
- With the help of disk checking utility
- With the help of BIOS/UEFI
- With the help of the laptop manufacturer’s custom diagnostic tool
- With the help of third-party software
All the methods mentioned above will help us diagnose and repair different issues. Now let’s explore the ways one by one:
Halt…. Halt…. Halt…… before moving any further, remember to backup your data either over the cloud or on any other removable media or on any other laptop. What we are going to do is irrecoverable.
Method # 1: With the Help of a Performance monitor
To view the real-time usage of CPU, Disk, Memory, Network, and Processes, Windows provides us with a handy tool called Performance Monitor. It is a handy tool that every Windows user should use to check the system resources, services, and running apps.
Let’s explore this utility in more detail.
Step # 1:
Press Windows + S key, and in the search bar, type “Perfmon”
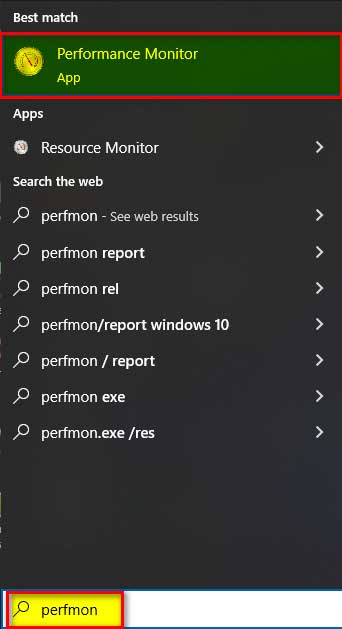
“OR”
Press Windows + R and to open the run and type “Perfmon”
“OR”
Type Windows + R then “cmd” and type “Perfmon.exe”
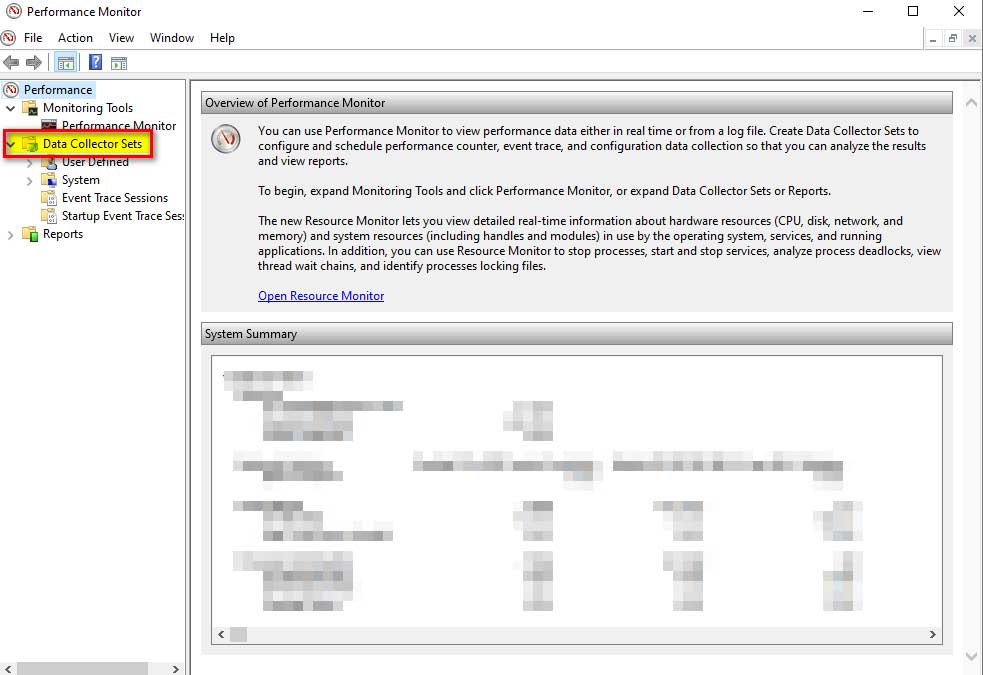
Step # 2:
After the “Performance Monitor” opens up, expand “Data Collector Sets” from the left pane.
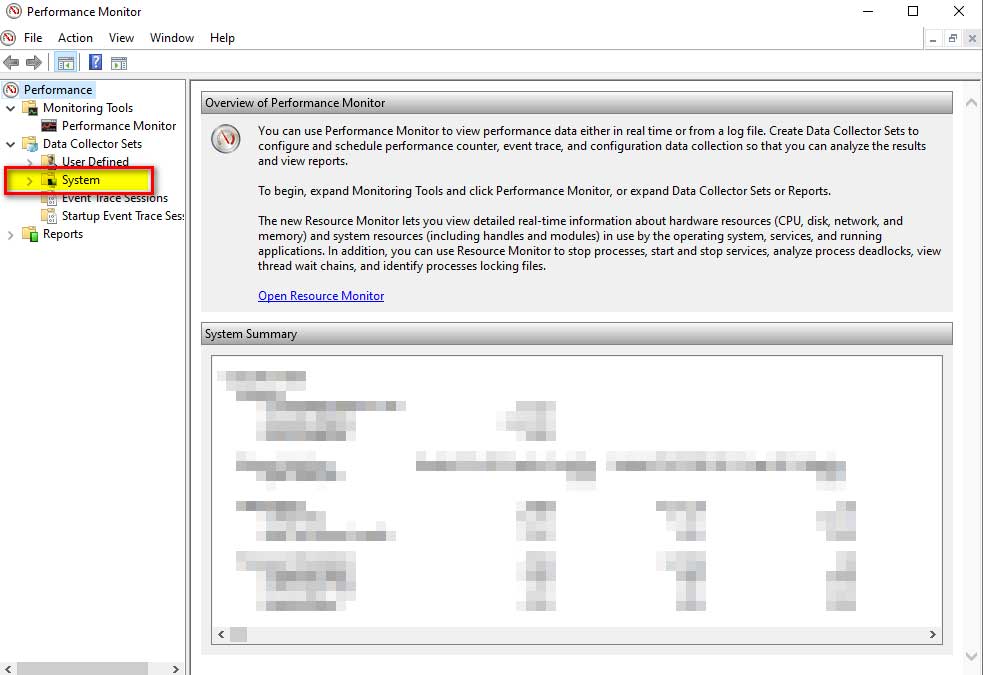
Step # 3:
Now click on “System” option.
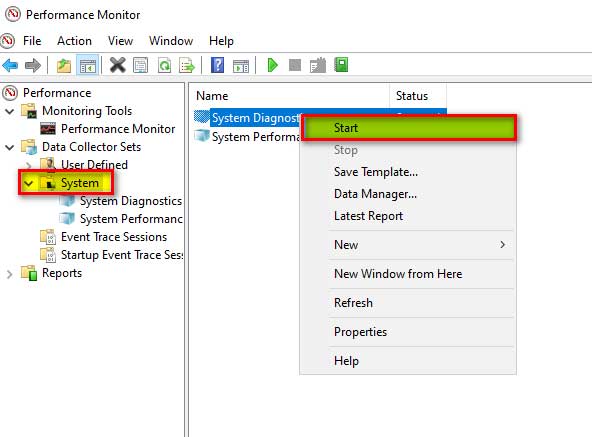
Step # 4:
Right-click on “System Diagnostics” in the right pane and select “Start” to run the diagnostic tests.
Step # 5:
Now once again, comes to the “Left Pane” and expand the “Reports” then “System” and open the “System Diagnostics.”
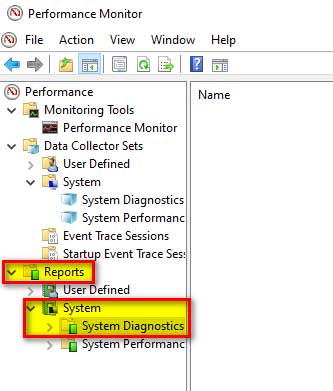
This will display all the reports with the dates
Step # 6:
Now we will double-click on recently generated report which will display the “Diagnostic Result” of the Laptop.
Method # 2: With the Help of Memory Diagnostic Tool
Windows 10 provides another important tool to diagnose the Memory called Windows Memory Diagnostic app. To run the app and get the required information, we need to follow the below steps:
Step # 1:
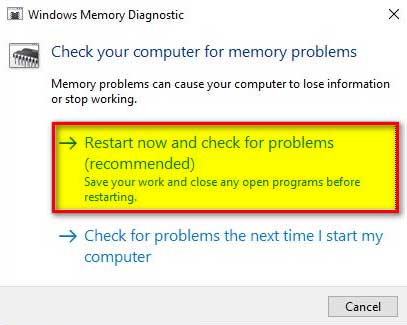
Press Windows + S key and type the “Windows Memory Diagnostic” button
Step # 2:
It will show the following screen from where select “Restart now and check for problems (recommended)”
Step # 3:
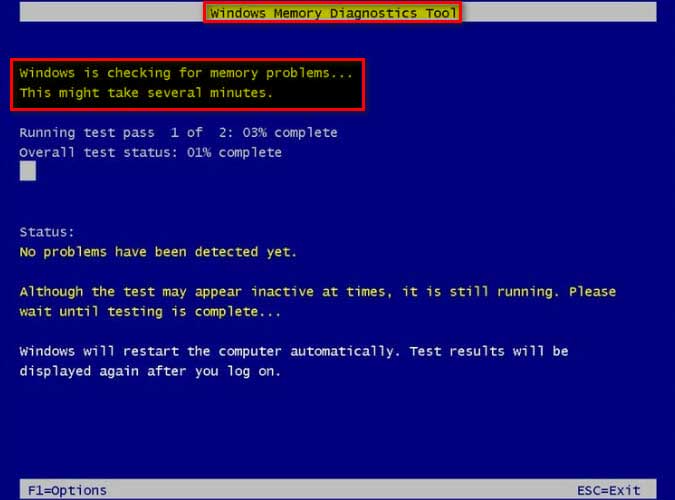
On the restart, Windows will start checking the memory module; all we need to do is to wait for the process to finish.
Step # 4:
After the wizard completes system will again restart, and then we need to log in again.
Step # 5:
After login, the result will be displayed, but if we miss the results, we can check them in the “Event Viewer” (which we will discuss separately in the following method).
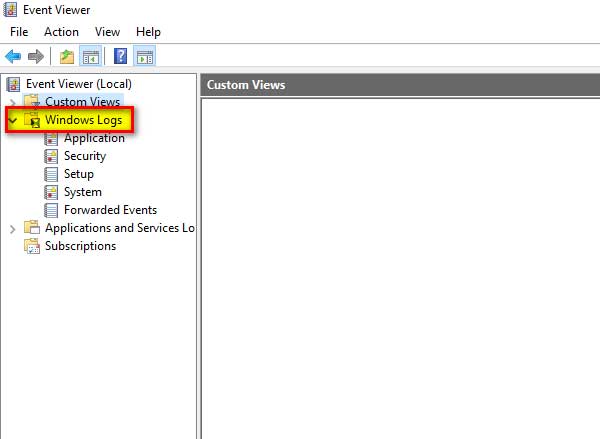
Method # 3: With the help of Event Viewer
Although event viewer is not the diagnostic utility, it is a place where all the logs are stored, but at times, this also helps find the error, which helps to troubleshoot the problem.
To better understand the Event viewer, we will continue the previous method’s example. Let’s find out how the Event viewer stores the Memory diagnostic logs.
For entering and analyzing the logs, we need to follow the below steps:
Step # 1:
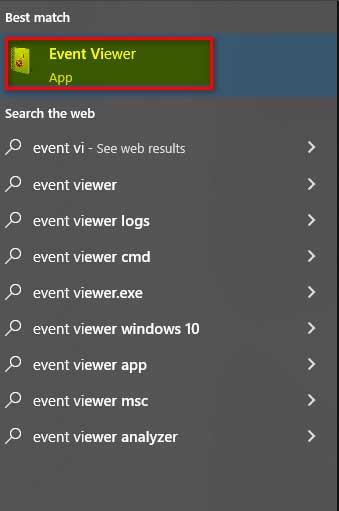
Search the Event Viewer by pressing Windows + S key
Step # 2:
Once the event viewer opens, we will go to the left pane, expanding the “Windows Logs.”
Step # 3:
In the very right pane in the “Action” menu under the “Systems” section, we will have the “Find” option.
Step # 4:
Now we will type the “Memory Diagnostic” logs we extracted in the previous method.
Step # 5:
Once we reach the logs, we can have the results under the “General” tab.
Similarly, we can find other logs based on their categories, such as “System”, “Application”, “Security”, and “Setup”.
Method # 4: With the Help of battery diagnostic (command prompt or via tools)
Another essential thing that needs our attention is the laptop’s battery, so running a diagnostic scan over this is highly desirable. For diagnosing the battery, we have two methods: we can generate the report with the help of the command prompt or run the third-party software for that.
Let’s explore both methods one by one.
Running from Command prompt
Step # 1:
Go to “Run” by pressing Windows + R button from the keyboard
Step # 2:
Type “CMD” and press the “Enter key” to open the command prompt

Step # 3:
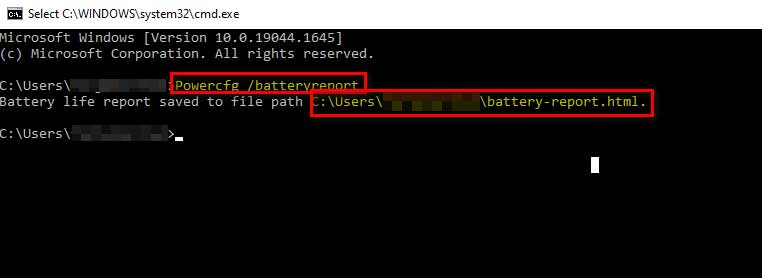
Over the “Command Prompt or PowerShell” type following command
C:\>Powercfg /batteryreport
It will by default save the report to C:\users\xyz\battery-report.html file (it could be change)
Step # 4:
Now a html-based battery diagnostic report will be generated on the above-mentioned path.
Running through a third-party tool
There are several third-party tools available which can diagnose the memory and provide us with a comprehensive report, such as:
- Memtest86: It is the best tool to test the Laptop RAM or a system. The unique quality of this tool is its small footprint, but it still performs exceptionally well, even better than the Windows memory diagnostic tool.
- BatteryInfoView: It provides us with complete and concise data about our laptop’s battery; we just need to run the app and click on the View ® Show Battery Information like designed capacity, charge capacity, battery health, etc.
View ® Show Battery log will give us a detailed analysis.
- PassMark BatteryMin: It monitors the battery charge level and provides us with a graph-based analysis. We can change the sampling interval as well with the help of Edit ® Configuration.
- Microsys Smarter Battery: It is a tool that provides laptop battery health and calibration and allows us to export the data for future purposes.
Method # 5: With the help of Disk Checking
Another component which requires our attention is the hard drive, which needs to be checked after a while as we rely entirely on this storage device. For checking the hard drive’s health, checking the disk is great.
To run and analyze the hard drive related errors, we will perform the following steps:
Step # 1:
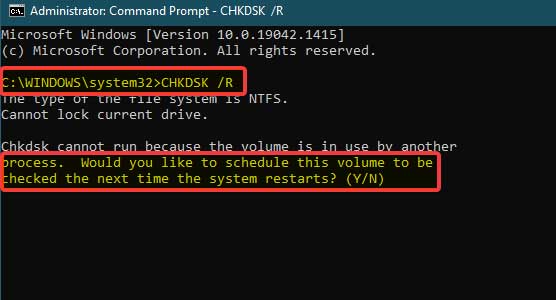
Go to “Command Prompt” and run it as administrator
Step # 2:
Type the following command
C:\>CHKDSK /R
It will prompt us to schedule the scan as we are currently using the drive.
Step # 3:
Now we need to restart the “Laptop” after which scan automatically begins.
Step # 4:
After completing the scan, it will display the result but if miss the output we can access it from “Event Viewer”
Method # 6: With the help of BIOS/UEFI
At time, the manufacturer also embeds the diagnostic utility in the BIOS or UEFI options; for this purpose, all we need to do is locate the option in BIOS /UEFI and run it. But remember accessing the BIOS is not as simple as it seems to be so accessing it with the help of the correct hotkey; otherwise, we will lose our data or crash hardware.
Method # 7: With the help of Manufacturer’s Custom Tool
Many vendors also provide a dedicated diagnostic utility, such as HP, Dell, Lenovo, etc. But to use it, we have two options: the utility needs to be installed on Windows 10, or it should come up with the boot option by default.
Let’s have a look at some of the famous manufacturer’s utilities:
HP Hardware Diagnostic Utility
Step # 1:
We have to install this utility from the internet, and afterwards, we can access it with the help of all programs or via searching by pressing Windows + S and typing HP Hardware diagnostic.
Step # 2:
We will click on System Test from the left pane to select System Fast Test or System Extensive Test.
Step # 3:
It is recommended to go for System Extensive Test due to its thoroughness. Now select Run Once.
Step # 4:
If the test fails, we will select the Troubleshoot, automatically resolving the issue.
Dell Diagnostic Utility
Dell also provides us with a similar kind of utility, but the only difference is we need to go to its website and run it from there.
Step # 1:
Go to Dell Support Website and select our system; we will press the Diagnostic by entering the service tag now. (Service Tag will be available either on the back of the laptop or in the BIOS of the Laptop).
Step # 2:
Once we have selected the desired product, we can choose Full Test, Custom Test, or Quick Test.
Step # 3:
After the test completes, we will check the issues and perform the possible solution accordingly.
Lenovo Diagnostic Utility
Like dell, we can run the diagnostic utility over the Lenovo Laptops by going to the Lenovo Support Website.
Step # 1:
Go to Lenovo Support Website and select our system by entering the Laptop serial number; now, we will press the Diagnostic.
Step # 2:
From here select Customize Scan.
Step # 3:
From here perform full scan.
Step # 4:
Once done we will check the result code for further action.
Method # 8: With the help of third party software
We also can run the third-party software for diagnosing the hardware and software. The primary reason this software is helpful for us is its comprehensiveness, due to which we can have a complete diagnostic test result by just running a single software.
Some of the most renowned software are as follows:
- Restoro PC Repair Tool: It is the best tool to test the Laptop errors, prevent data loss hardware failure, and optimize it for maximum performance.
- Aida64 Extreme: It is used to diagnose the hardware issues of the laptops and help us resolve them in no time.
- Crystal Disk Info: Another tool that provides comprehensive information about the disk drives of the Laptop.
- Intel Processor Diagnostic Tool: As it is clear with the name it diagnosis the processor of the Laptop by performing the stress tests.
- JSScreen Fix: It is specially designed to check the laptop screen in case we have found some dots on the screen. It is a quite handy tool which efficiently diagnoses screen-related problems.
Closing Statement:
In this article, we have tried to cover all major points of running a diagnostic on Windows 10 based Laptop. In our opinion, the best way to diagnose is with the help of a diagnostic utility given by the manufacturers.
They can perform all the tests in a single run, and we do not need to run multiple utilities, which is time-consuming.
But if someone intends to reuse the media, then all other methods can do the trick.
References:
- https://www.lifewire.com/run-diagnostics-on-windows-5214801
- https://www.makeuseof.com/tag/how-to-test-your-pc-for-failing-hardware/
- https://www.makeuseof.com/tag/5-tools-analyze-laptop-battery-life/
- https://medium.com/@michelsmith2021/how-to-run-diagnostics-on-windows-10-2993b510c2bf
- https://www.isunshare.com/windows-10/5-ways-to-open-performance-monitor-on-windows-10.html
- https://windowsreport.com/run-hardware-diagnostics-windows-10/