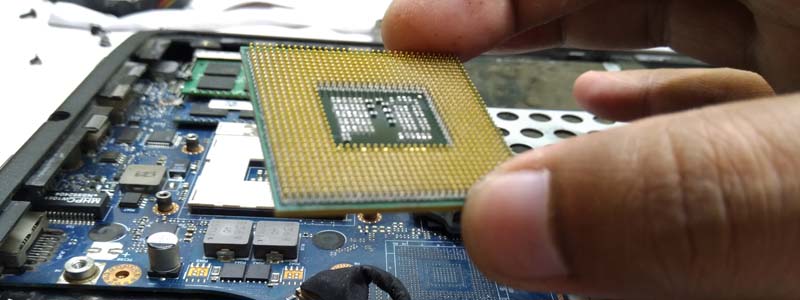
The honest answer in 2026 is that you almost certainly cannot upgrade your laptop’s processor. Since Haswell, Intel’s mobile chips have shipped exclusively in BGA packages — soldered directly to the motherboard with a grid of solder balls, not sitting in a socket — and AMD’s mobile parts went the same way. There is nothing to unscrew and lift out.
This guide is deliberately blunt about that, because the wasted money here is real: people buy a CPU that will never fit, or pay for a reflow attempt on a machine that was never designed for it. What follows covers how to check whether yours is one of the rare socketed exceptions, the full procedure if it is, and what actually gives an old laptop more speed when it isn’t.
Check this before you buy anything. Socket G3 (rPGA946B) for Haswell was the last pin grid array socket for Intel’s mobile processors — every mobile microarchitecture succeeding Haswell is available exclusively in BGA packaging. If your laptop is newer than roughly 2014, the CPU is soldered and no purchase will change that.
What’s Inside
- 1 – Why Nearly All Laptop CPUs Are Soldered in 2026
- 2 – The Exceptions: Laptops That Can Still Take a New CPU
- 3 – How to Check Whether Your Laptop CPU Is Socketed
- 4 – Finding a Compatible Replacement Processor
- 5 – How to Replace a Socketed Laptop Processor Step by Step
- 5.1 – Step 1: Update the BIOS
- 5.2 – Step 2: Remove the Battery
- 5.3 – Step 3: Remove the Back Cover
- 5.4 – Step 4: Remove the Keyboard
- 5.5 – Step 5: Remove the Upper Shell
- 5.6 – Step 6: Remove the Display Assembly
- 5.7 – Step 7: Remove the Heatsink
- 5.8 – Step 8: Replace the CPU
- 5.9 – Step 9: Apply Thermal Paste and Reassemble
- 6 – What to Do Instead When the CPU Is Soldered
- 7 – Final Thoughts on Upgrading a Laptop Processor
Why Nearly All Laptop CPUs Are Soldered in 2026
A BGA package is attached by reflowing hundreds of solder balls between the chip substrate and the board. Removing one requires a hot-air or IR rework station, controlled preheat of the whole board, a reballing step, and precise placement — and doing it without warping a thin multi-layer laptop board is genuinely difficult work.
This applies right up to the fastest mobile parts. Intel’s Core Ultra 7 255HX, one of the highest-power mobile chips on the market, lists FCBGA2114 as its package. The HX series is the desktop-derived line in laptops, and even it is soldered down.
Even where a rework succeeds mechanically, the chip has to be one the firmware recognizes. Laptop BIOS images carry microcode only for the specific parts that model shipped with, so an unsupported chip on a correctly reflowed board still produces a machine that will not POST.
Soldered silicon is part of a wider pattern rather than a one-off decision. It is the same design direction that has made soldered memory standard on consumer laptops, where the modularity that survives is the exception rather than the rule.
The Exceptions: Laptops That Can Still Take a New CPU
Three categories genuinely allow a processor change. Everything else does not.
- Older socketed machines. Intel laptops up to and including 4th-generation Haswell M-suffix parts on Socket G3, and the earlier Socket G1 and G2 generations before it. AMD had equivalent socketed mobile packages in the same era. These are pre-2015 machines, and this is the scenario the step-by-step below covers.
- Desktop-CPU laptops. A small number of large chassis — Clevo barebones sold under names such as Sager, Eurocom and XMG — take standard desktop LGA processors in a socket. Eurocom publishes per-model CPU upgrade lists for machines like these. They are niche, heavy, and expensive, but the socket is real.
- Modular mainboard designs. Framework does not socket the CPU either, but it sells the whole mainboard as a replaceable part — the mainboard can be removed and replaced with any compatible one in the same form factor, with the old board remaining usable on its own. That is a genuine processor upgrade path, achieved by replacing the board rather than the chip.
How to Check Whether Your Laptop CPU Is Socketed
Do this before spending anything. It takes a few minutes and settles the question completely.
- Identify your exact processor. In Windows 11, Settings > System > About names it, or run CPU-Z, which reports the package type directly on its CPU tab.
- Look the part number up on Intel ARK or AMD’s product pages and read the package or “sockets supported” field. Anything beginning FCBGA is soldered. An FCPGA or rPGA entry means a socket.
- Download your laptop’s service manual. Manuals for socketed machines describe processor removal as a procedure; manuals for soldered ones list the board and CPU as a single assembly.
- Search for the model with its CPU options. A machine sold with several processors on the same board is a promising sign; a machine sold with one fixed configuration usually isn’t.
The package field is the one that decides it. Everything else is corroboration.
Finding a Compatible Replacement Processor
If you have confirmed a socket, the next job is finding a chip the machine will actually run. Matching the socket is necessary but not sufficient — the chipset, the BIOS microcode and the cooler’s heat capacity all constrain the choice.
- Search for your notebook model plus “CPU” to see which processors were sold in that chassis during its production run. Chips that shipped in the machine are chips the firmware knows about.
- Read the service manual’s specification section, which lists every processor the model was offered with. This is the authoritative list.
- Check the manufacturer’s own support forum for reports from owners who have made the same swap on the same model.
- Compare TDP. A chip with a higher TDP than anything the machine shipped with will run into the cooler’s limits and throttle, giving back the gain you paid for.
For instance, the Lenovo G560 service manual lists the P6200, i3-380M and i5-430M alongside the P6100 the machine here shipped with — and on the Lenovo forum, one owner confirmed the i3-380M working in the same chassis.
The worked example running through the rest of this guide is that machine: a Lenovo G560 with a 2.13GHz Pentium P6100, 2GB of memory, a 250GB hard disk and Intel HD graphics, upgraded to a 2.40GHz Core i5-430M. Its PassMark CPU score went from 1349 to 2368 after the swap.
Buy from a seller who accepts returns. Used mobile CPUs of this era come from salvaged boards, and bent pins and dead chips are common.
My Recommended Laptop Toolkit!


Last update on 2026-09-17 / Affiliate links / Images from Amazon Product Advertising API
How to Replace a Socketed Laptop Processor Step by Step
Every chassis differs, so work from your model’s service manual alongside these steps. The sequence below reflects a full teardown on a machine where the processor sits under the upper shell.
Step 1: Update the BIOS
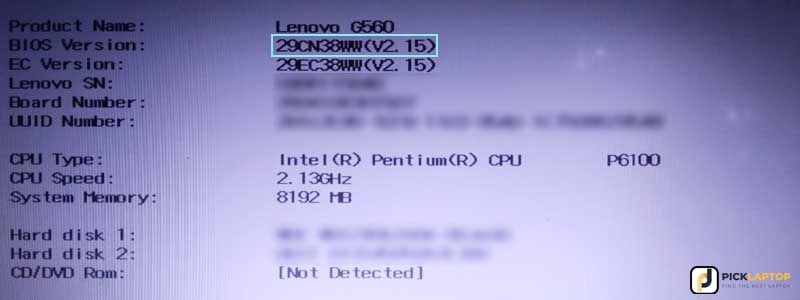
Do this while the machine still boots with its original CPU. Manufacturers sometimes add microcode for newer processors in later BIOS releases, and if you install a chip the current firmware doesn’t recognize, the system will not POST — leaving you no working machine from which to flash an update.
Get the latest version from your manufacturer’s support downloads for that exact model. On the G560 here, the newest release listed on Lenovo’s download page is 29CN38WW, and that was applied before opening the machine.
Kill the power properly before you open anything. Shut down fully, unplug the charger, remove the external battery, and disconnect the internal battery connector from the board once the cover is off — switching off alone leaves parts of the board live. Wear a grounded anti-static strap, keep conductive tools clear of the battery, and stop immediately if you find a swollen cell or burned components.
Step 2: Remove the Battery
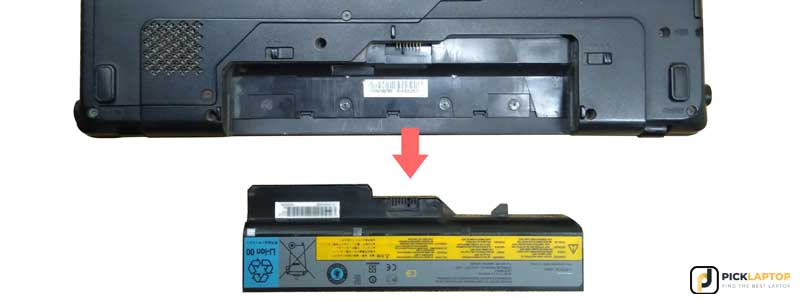
Remove the battery and any dummy card first. Machines of this era generally have a removable pack; on a laptop with an internal battery you reach the connector after the back cover comes off, and it comes off before anything else is touched.
The G560 used here has a single back cover giving access to the memory, hard drive and processor, which makes it unusually convenient. Your service manual will tell you how far you have to go.
Note: Laptops with built-in batteries need more care when opening, as part of the motherboard stays powered until the connector is unplugged. A dropped screw landing on a live board can cause serious damage.
Step 3: Remove the Back Cover
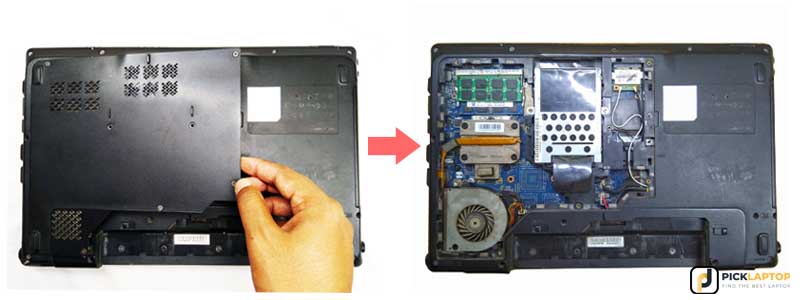
With both power sources disconnected, unscrew the back cover. On the machine here that exposes the processor directly; on many others it does not, and the upper half has to come apart as well.
If the CPU is not visible, remove every screw from the underside before going further. Keep them sorted by position — lengths usually differ, and a long screw in a short hole will punch through.
Note: Screws are often hidden under rubber feet or stickers, so check for those before assuming the base is free. Remove the hard drive or any other component that sits in the way.
Step 4: Remove the Keyboard
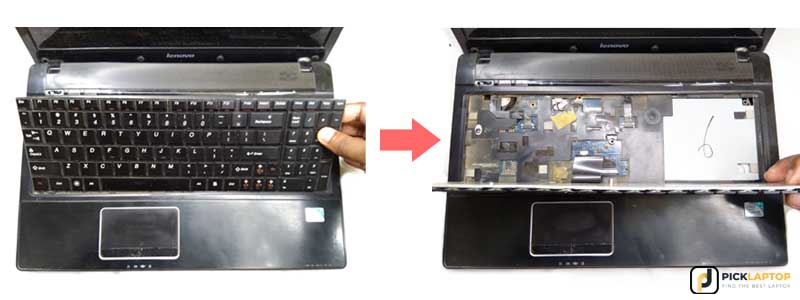
With the underside screws out, the keyboard, optical drive and wireless card should be loose. Lift the keyboard gently and release its ribbon cable at the connector rather than pulling on the ribbon itself.
Keyboards on some models are held by clips along the top edge and need patient work with a plastic tool. Force here cracks the plastic frame or tears the ribbon, and neither is easily repaired.
Take out the optical drive and the wireless adapter while you are here, noting which antenna lead goes to which terminal.
Note: Record each screw’s original location — a labeled magnetic mat or a phone photo at each stage saves considerable time on reassembly.
Step 5: Remove the Upper Shell
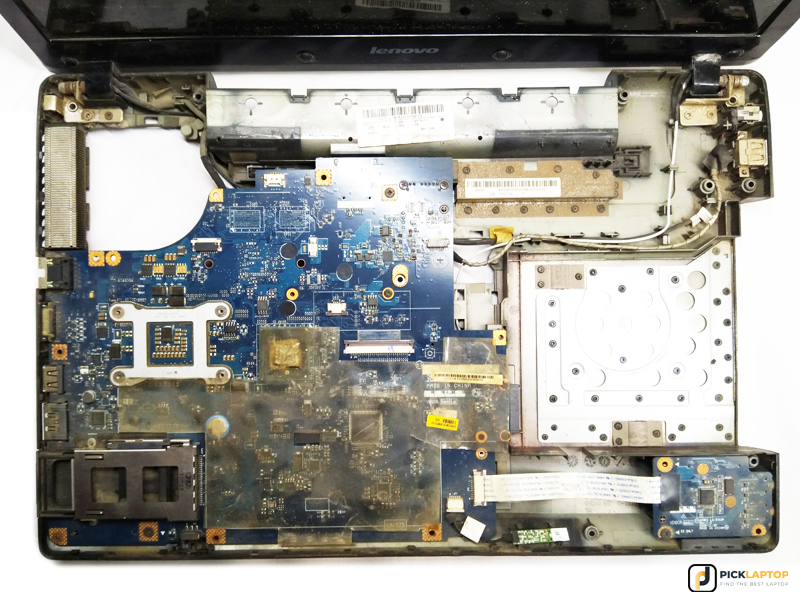
More screws usually sit beneath the keyboard. Remove those, then release the touchpad, power button and status LED ribbons from their connectors before lifting the shell.
Lift slowly and watch for cables still attached at the far edge. Ribbon connectors on these boards have small locking flaps that must be flipped up before the cable will release.
Note: Don’t apply force. If the upper shell resists, there is a screw or clip still holding it — recheck the base rather than levering harder.
Step 6: Remove the Display Assembly
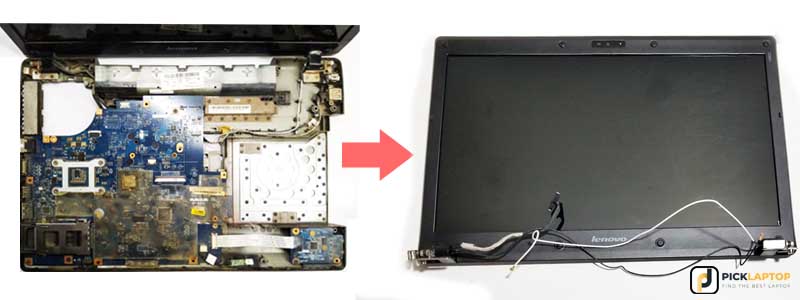
On some designs the hinge bolts are accessible before the upper shell comes off, in which case this step happens earlier. Follow whatever order your manual gives.
Unscrew the hinges, unplug the video cable and the Wi-Fi antenna leads, and set the display aside on a soft surface where it cannot be knocked over.
Step 7: Remove the Heatsink
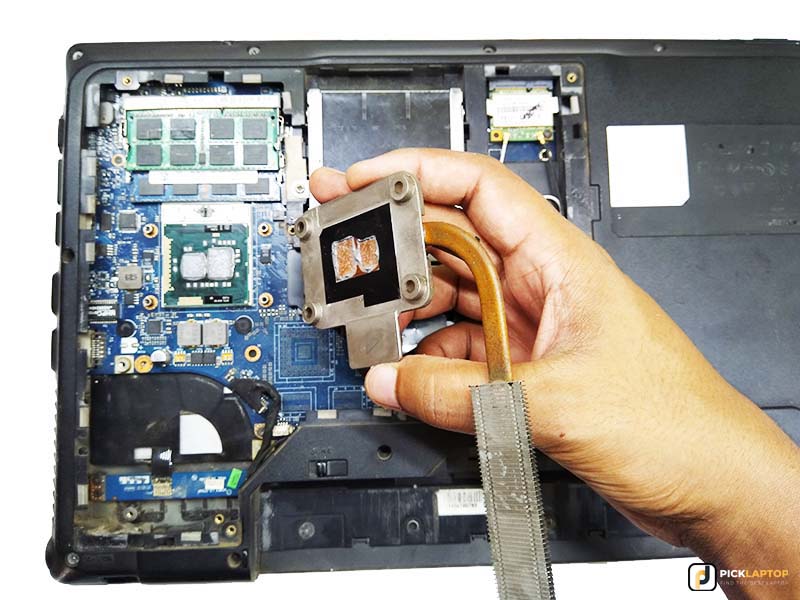
With the board exposed, unplug the fan connector and loosen the heatsink screws gradually in the numbered order stamped on the bracket, going round more than once rather than fully removing one at a time.
If the processor is on the underside of the board, the board itself has to come out — remove its remaining screws and every connector before lifting.
The cooler is often stuck to the die by cured paste. Twist gently to break the bond instead of pulling straight up, which can lift the chip out of the socket with it.
Note: Wear a properly grounded anti-static strap before touching any internal component.
Step 8: Replace the CPU
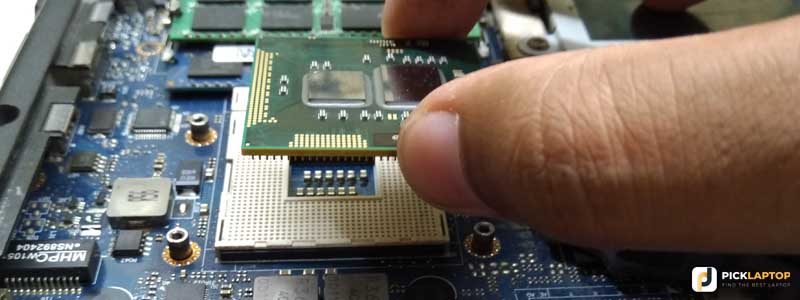
Mobile sockets use a captive cam screw. Turn it counterclockwise until it stops, then lift the old processor straight up and out — with the cam released it should come away with no resistance at all.
Line up the missing-pin corner on the new chip with the matching corner of the socket and let it drop in under its own weight. If it needs pressure, it is misaligned; lift it out and check the orientation rather than pushing. Bent pins on these packages are difficult to straighten and easy to snap.
Turn the cam screw clockwise until it stops to lock the chip in place.
Note: Some older laptops use a locking bar rather than a cam screw on the CPU socket.
Step 9: Apply Thermal Paste and Reassemble
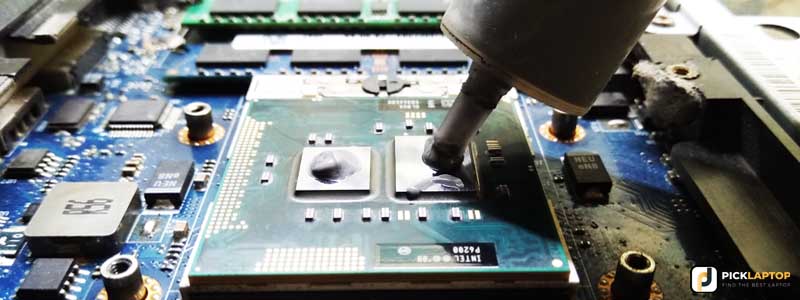
Clean the old paste off both the die and the heatsink contact face. iFixit’s repasting guidance is to use isopropyl alcohol above 90% concentration, then apply a drop about the size of a grain of rice to the center of the die and let mounting pressure spread it. Use plastic tools rather than metal on bare silicon, and let both surfaces dry fully.
Replace any thermal pads that were damaged or compressed flat during disassembly, matching the original thickness. Paste is not a substitute for a pad — the gaps those bridge are far too large.
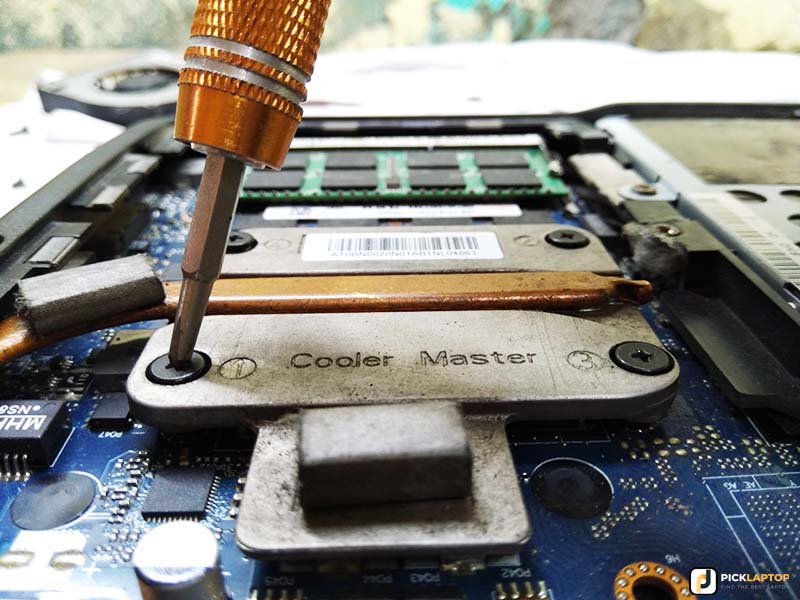
Refit the heatsink, tightening its screws a little at a time in the numbered sequence so the cold plate seats evenly on the die. Reassemble in reverse order, reconnecting every ribbon before closing each layer.
Boot into the BIOS first and confirm the new processor is detected correctly before loading Windows.
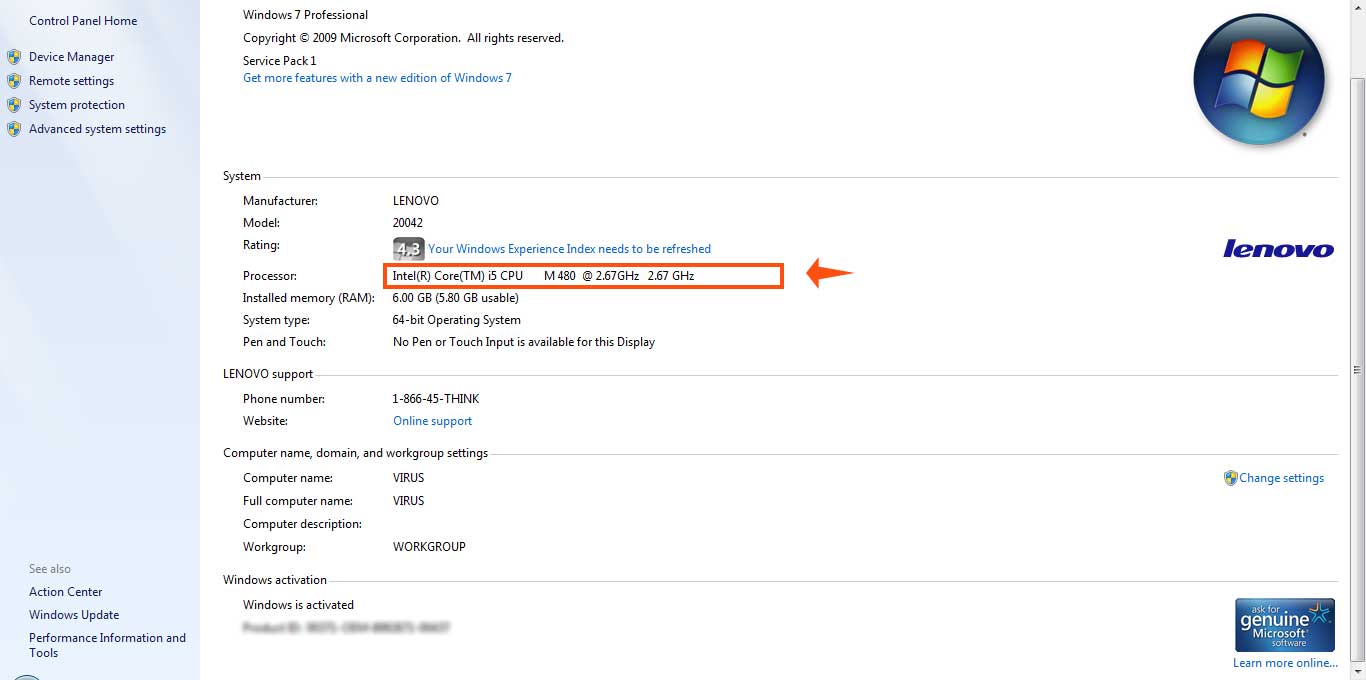
Then watch temperatures under load for the first few sessions. A CPU swap is also a repaste, and a poorly seated cooler shows up as thermal throttling rather than as an obvious failure — our guide to diagnosing an overheating laptop covers how to read that.
Note: Windows occasionally fails to boot after a processor change and needs repair or reinstallation. Have a backup before you start.
What to Do Instead When the CPU Is Soldered
For most people reading this, the CPU is soldered — so the useful question is what else buys back speed. On an older laptop, the processor is rarely the actual bottleneck.
- Replace a mechanical hard disk with an SSD. This is the largest single improvement available on a pre-SSD machine, and it changes boot times, application launches and general responsiveness far more than a modest CPU step would. Our walkthrough of swapping a laptop hard drive for an SSD covers form factors and cloning.
- Add memory, if the slots exist. A machine paging to disk feels slow in a way no processor fixes. Check whether yours has SO-DIMM slots or soldered memory before buying.
- Restore the cooling. A throttling laptop is already giving away the performance it has. Cleaning the fin stack and replacing dried paste and pads recovers clock speed you have already paid for.
- Replace the whole board. On a Framework machine this is the supported route. On others, a used board with a better CPU from the same model family sometimes exists — verify it is the same chassis revision and that firmware and connectors match before buying.
If the machine is genuinely CPU-limited after all of that, replacing it is the rational move. A soldered-CPU laptop has a fixed performance ceiling by design, and no amount of work changes that.
Can you upgrade a laptop processor?
On the overwhelming majority of laptops made since about 2015, no. Socket G3 for Haswell was the last pin grid array socket for Intel mobile processors, and every mobile architecture after it ships only in BGA packaging — soldered to the board. Older socketed machines, a few Clevo-derived desktop-CPU laptops, and Framework’s replaceable mainboards are the exceptions.
How do I know if my laptop CPU is soldered or socketed?
Find your exact processor model, then check its package field on Intel ARK or AMD’s product page. Anything listed as FCBGA is soldered; FCPGA or rPGA means a socket. CPU-Z reports the package directly, and the service manual confirms it — socketed machines document processor removal as a procedure.
Can a BGA soldered laptop CPU be replaced by a repair shop?
A board-level shop with hot-air or IR rework equipment can physically do it, but the chip still has to be one the BIOS carries microcode for, or the machine will not POST. Between the labor cost, the risk of warping a thin board and the firmware constraint, it is rarely a sensible spend on a consumer laptop.
How do I find a compatible replacement for my old laptop’s processor?
Start with the service manual’s specification section, which lists every CPU that model shipped with — those are the ones the firmware knows. Cross-check with owner reports on the manufacturer’s forum, and compare TDP so you don’t fit a chip the cooler cannot keep up with.
Do I need to update the BIOS before changing the processor?
Yes, and do it while the original CPU is still fitted. Manufacturers sometimes add support for newer chips in later BIOS releases, and if the installed firmware doesn’t recognize the new processor the machine won’t POST — leaving you without a working system to flash from.
Will a faster processor make my old laptop feel faster?
Not usually, on a machine that still has a mechanical hard disk or too little memory. Storage and memory are the common bottlenecks on older laptops, and both are far more likely to be upgradeable than the CPU.
Does upgrading the processor void the warranty?
Check your model’s warranty terms and service manual. Some manufacturers document storage and memory as customer-replaceable while treating the processor as a service-center part. On any machine still in warranty, get the terms confirmed before opening it.
Can I put a desktop CPU in a laptop?
Only in the small number of large chassis specifically built around a desktop socket — Clevo barebones sold under names like Sager, Eurocom and XMG. On any normal laptop the socket does not exist, and the cooling and power delivery could not support a desktop part even if it did.
Final Thoughts on Upgrading a Laptop Processor
Check the package field before you spend a penny. If it reads FCBGA, the project ends there, and knowing that early is worth more than any amount of disassembly advice.
Where a socket does exist, the work is methodical rather than difficult: flash the BIOS first, match the chip to the manual’s list, and treat the repaste as part of the job rather than an afterthought.

This website truly has all of the information I needed about
this subject and didn’t know who to ask.
Glad it helped, John! Thanks for the comment.