Swapping a mechanical hard drive for an SSD is still the single biggest speed improvement available on an older laptop, and unlike a CPU swap it is a job most people can actually finish. Boot times, application launches and file searches all improve, because a flash drive has no seek latency to pay.
Two things have changed since guides like this were first written. The free cloning software everyone recommended has largely gone paid, and a large share of current laptops have no 2.5-inch bay at all. This guide covers what your machine actually accepts, which tools still work, and how to move Windows across without reinstalling it.
What’s Inside
- 1 – Check What Drive Your Laptop Actually Accepts
- 2 – Many Thin Laptops Have No 2.5-inch Bay at All
- 3 – Check Your Warranty Before Opening the Machine
- 4 – Fresh Install or Clone: Choosing Your Method
- 5 – Cloning Software That Still Works in 2026
- 6 – Cloning Your Drive with a USB Adapter or Enclosure
- 7 – Cloning Without an Adapter Using a Disk Image
- 8 – What to Do After the SSD Is Installed
- 9 – Final Thoughts on Upgrading a Laptop to an SSD
Check What Drive Your Laptop Actually Accepts
Buying the drive before checking the slot is the most common way this project goes wrong. There are three formats in circulation and they are not interchangeable, even when the connector physically fits.
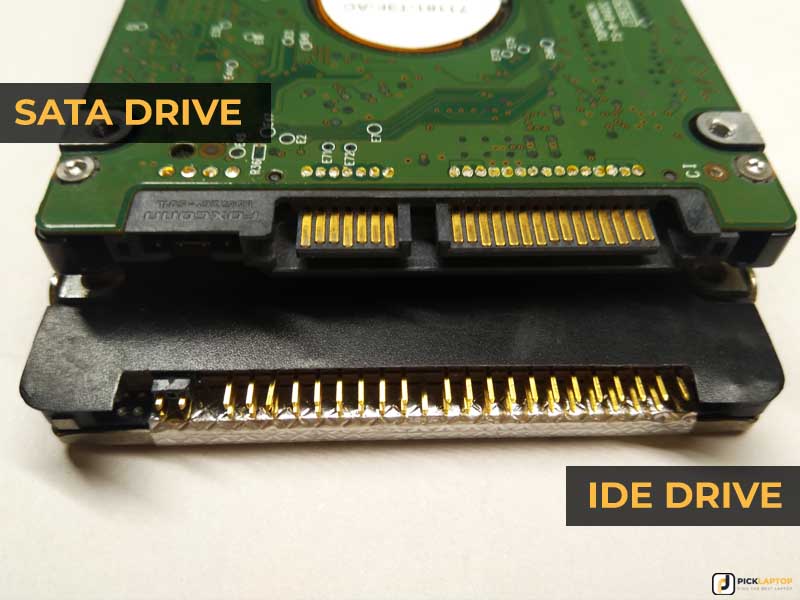
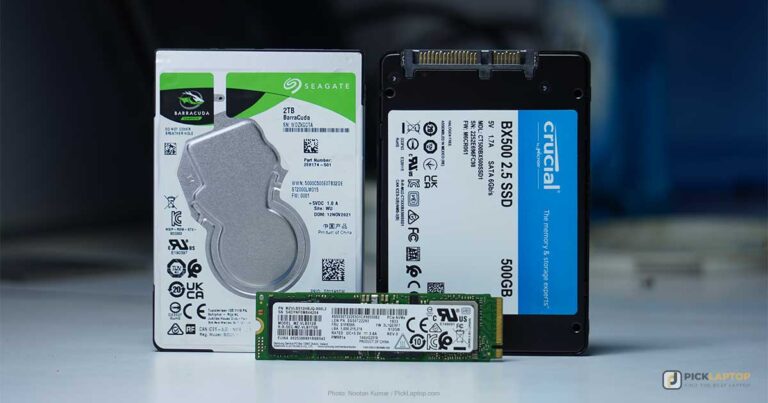
2.5-inch SATA, M.2 SATA and M.2 NVMe
- 2.5-inch SATA. The drop-in replacement for a laptop hard disk, in the same 2.5-inch shell with the same SATA connector. Thickness matters: slim chassis take 7mm drives, older ones take 9.5mm, and a 9.5mm drive will not fit a 7mm bay.
- M.2 SATA. A bare circuit board in the M.2 slot, but running the same SATA protocol at the same ceiling speed as a 2.5-inch drive. Smaller, not faster.
- M.2 NVMe. The same physical slot, but speaking NVMe over PCIe lanes rather than SATA. Substantially faster, and the format nearly all current laptops use.
M.2 keying is where this gets confusing, because the notch in the card edge does not by itself tell you what the socket supports. ATP’s breakdown explains that B key carries SATA and up to two PCIe lanes, M key carries up to four PCIe lanes, and B+M keyed cards fit both sockets but are limited to SATA or two lanes.
A drive that fits is not a drive that works. ATP puts it directly: a matching key guarantees the module seats, not that it functions, because an M-keyed socket may be wired for PCIe only, SATA only, or both — a SATA drive in a PCIe-only socket will seat but never be detected. Confirm what the socket is wired for, not just its shape.
Length matters too. M.2 cards come in 2230, 2242, 2260 and 2280 sizes — the last two digits are the length in millimeters — and the standoff position on the board decides which lengths mount. 2280 is the common laptop size, but compact machines increasingly use 2230.
How to Find Out Which Your Machine Has
- Find your exact model number on the sticker underneath the machine, then download the service manual or maintenance guide from the manufacturer’s support site. The storage section states the supported form factors, lengths and interfaces outright.
- Run a compatibility scanner such as Crucial’s System Scanner, which reads your system configuration and reports which drives fit. Treat it as a cross-check against the service manual rather than the only source.
- Look at what is already installed. In Windows 11, Device Manager under Disk drives names the current drive, and searching that model number tells you its interface and form factor.
- Check an iFixit teardown for your model if one exists. Photographs settle questions about empty slots and bay thickness that spec sheets leave vague.
If your machine is genuinely old enough to use an IDE/PATA drive, SSDs in that interface exist but are a niche, expensive product. On hardware that old, weigh the cost against replacing the laptop.
Many Thin Laptops Have No 2.5-inch Bay at All
The 2022-era assumption that most laptops have a 2.5-inch SATA slot no longer holds. Ultrabooks and most thin mainstream machines dropped the bay years ago in favor of a single M.2 socket soldered-adjacent to the board, and some go further and solder the storage down entirely.
The practical consequences matter before you order anything. On a single-M.2 machine there is no way to run the old and new drives at once internally, so cloning requires an external enclosure. On a machine with soldered storage, there is no upgrade at all — the same trend that has made soldered memory the default on consumer laptops has been working through storage too.
Machines that still have a 2.5-inch bay tend to be budget models, business lines and larger gaming chassis — often alongside an M.2 slot, which is the configuration that lets you add an SSD and keep the hard disk for bulk storage.
What Current SSD Prices Mean for This Upgrade
Timing is less favorable than it was. NAND flash pricing has risen sharply through 2026, driven by AI data center demand pulling production away from consumer drives — the same squeeze behind this year’s RAM and SSD price spike, which also explains why buying only the capacity you need is a more sensible strategy right now than sizing up by default.
That changes the calculation in one specific way: on a machine with both an M.2 slot and a 2.5-inch bay, putting the operating system on a modest SSD and leaving the existing hard disk in place for media is a far cheaper route to the same everyday responsiveness than buying one large SSD.
Check Your Warranty Before Opening the Machine
Storage is a user-serviceable part on many laptops, and opening a service hatch to reach it is often explicitly permitted. On others it is not, and the manufacturer’s terms are the only thing that settles which case you are in.
Read the warranty document for your model and check whether the service manual documents storage replacement as a customer-replaceable procedure. If it does, you are on solid ground. If the machine is under warranty and the manual does not, having the upgrade done by the manufacturer or an authorized service center is the safer route.
Fresh Install or Clone: Choosing Your Method
There are two ways to do this, and the choice mostly comes down to how much you want to keep.
Fresh install. Fit the SSD, then install Windows onto it from scratch using Microsoft’s Windows 11 installation media tool to build a bootable USB. This is simpler, avoids cloning software entirely, and leaves you with a system carrying none of the accumulated clutter. You reinstall your applications afterwards.
Clone. Copy the existing drive wholesale to the SSD so Windows, settings, applications and files all come across intact. More convenient, but it needs cloning software and a way to connect both drives at once.
Check the Windows 11 requirements before a fresh install. If your laptop shipped with Windows 10, confirm it meets the Windows 11 hardware requirements — TPM 2.0 and a supported processor among them — before wiping a working installation. Microsoft ended Windows 10 support in October 2025, so staying on it is not a long-term answer either.
Cloning Software That Still Works in 2026
The free-tool landscape changed after 2022 and most older guides now name software that either no longer exists in a free form or has moved cloning behind a paywall.
Macrium Reflect Free is gone. Paramount Software retired the free edition — security patches ended on 1 January 2024, with no feature updates after the final free build. Copies circulating on download sites are unsupported and no longer receive security fixes. It is the tool most 2022 guides recommend, and it should not be your starting point now.
Check the current licensing yourself before downloading anything, because these terms keep moving. As of now the realistic options are:
- Manufacturer-bundled tools. Several SSD makers supply cloning software free with their own drives — Samsung’s Data Migration and Samsung Magician for Samsung drives, and Acronis True Image for Crucial for Crucial drives. If you have bought that brand, start here: it is free, supported, and built for exactly this job.
- Clonezilla. Genuinely free and open source, boots from USB, works regardless of drive brand. The interface is a text-mode wizard rather than a modern GUI, and it is unforgiving about source and destination selection, but it does the job without a license.
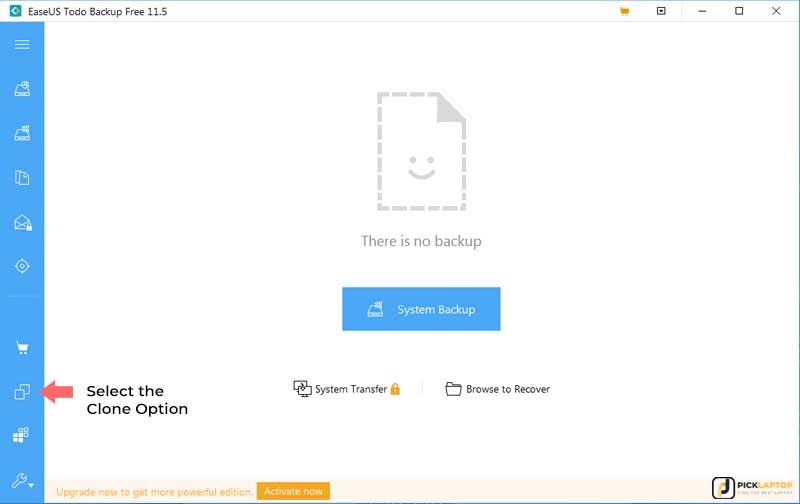
- Commercial tools. Macrium Reflect’s paid editions, Acronis True Image and EaseUS Todo Backup all still offer cloning. Verify what the current free tier includes before assuming a download will clone anything — vendors have repeatedly moved disk cloning into paid tiers.
Whichever you use, the sequence is the same across all of them, and the original steps in this guide still map cleanly onto current versions.
Cloning Your Drive with a USB Adapter or Enclosure
This is the straightforward route. You connect the new SSD externally, clone onto it while Windows is running, then swap the drives.
You need the right adapter for the drive you bought. A 2.5-inch SATA SSD needs a SATA-to-USB cable or dock; an M.2 NVMe drive needs an NVMe-specific USB enclosure, and a SATA-to-USB adapter will not work with it. M.2 enclosures are usually specific to one protocol, so check the listing states NVMe or SATA to match your drive.
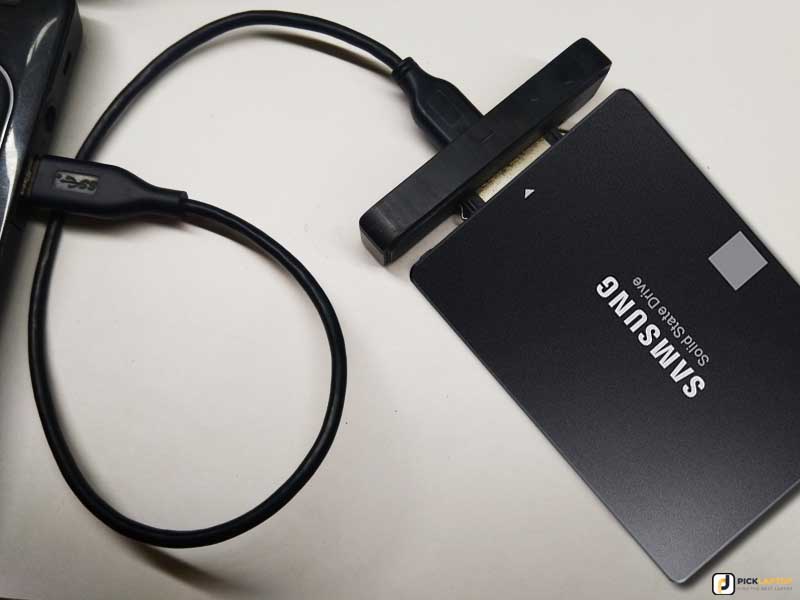
- Back up anything irreplaceable to a separate device first. Cloning writes over the destination completely, and a mis-selected destination is unrecoverable.
- Connect the SSD via the adapter or enclosure and confirm Windows sees it in Disk Management. A brand-new drive appears uninitialized, which is normal.
- Launch your cloning tool and find its clone or disk copy function.
- Select the source drive — your existing internal disk. Check the capacity and model shown, not just the drive letter.
- Select the destination — the connected SSD. Confirm it twice. Reversing source and destination destroys the data you are trying to keep.
- Enable SSD alignment or optimization if the tool offers it, so partitions land on correct boundaries.
- Review the proposed partition layout, then start the clone and let it finish without interruption.
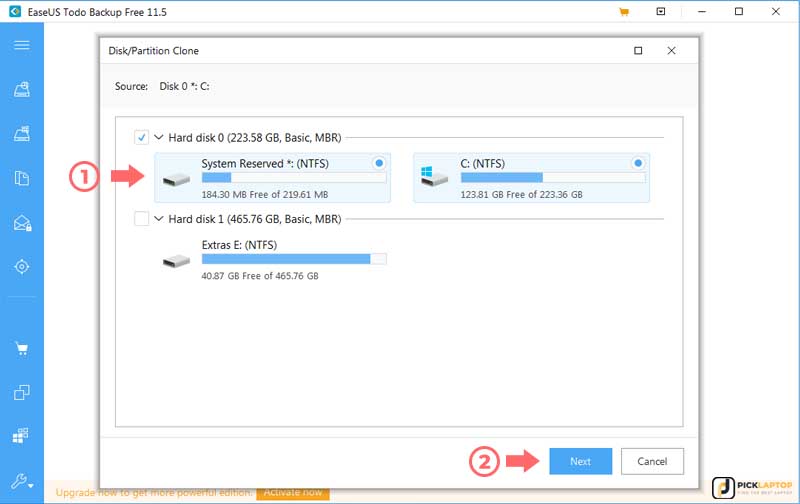
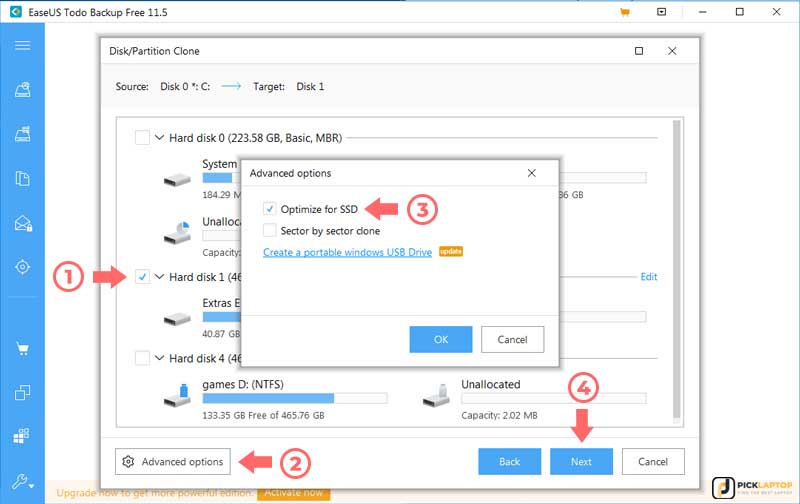
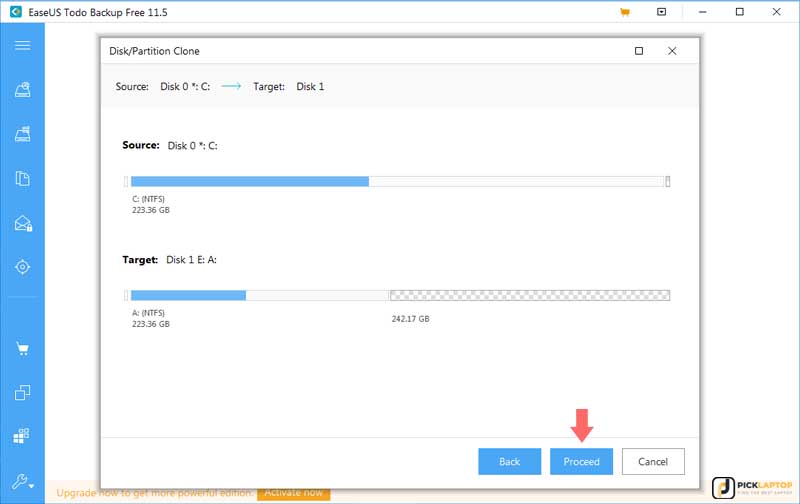
Two constraints catch people out. The used data on the source must fit within the SSD’s capacity, and most tools require you to shrink the source partition first if it does not. Cloning also copies the partition scheme, so a source using the older MBR layout produces an MBR clone — which will not boot on a machine configured for UEFI without conversion.
Fitting the New Drive
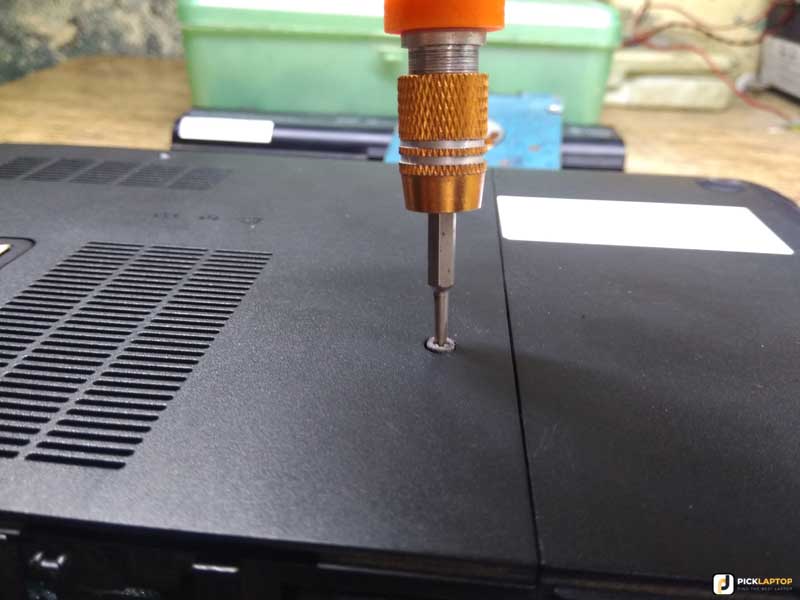
With the clone complete, shut the machine down fully, unplug the charger, and remove the back panel. Where the battery is internal, disconnect its connector from the board before touching storage — powering off alone leaves parts of the board live.
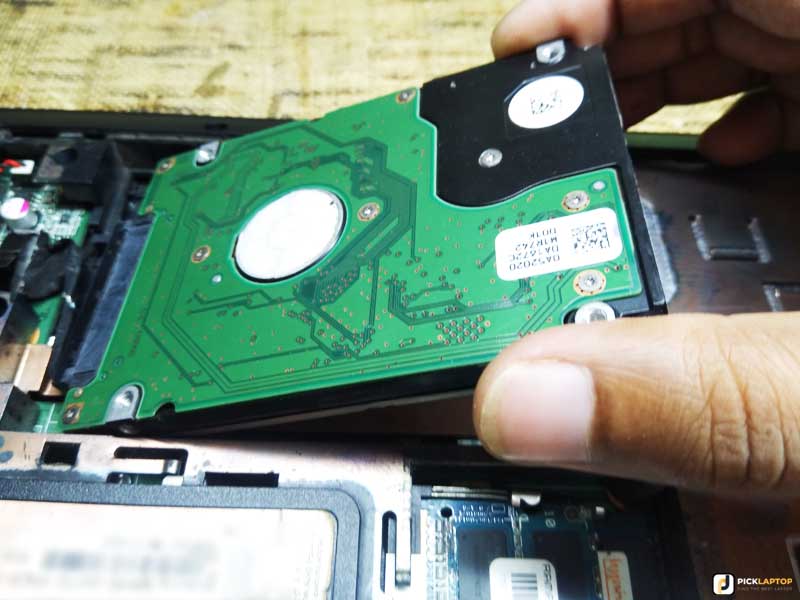
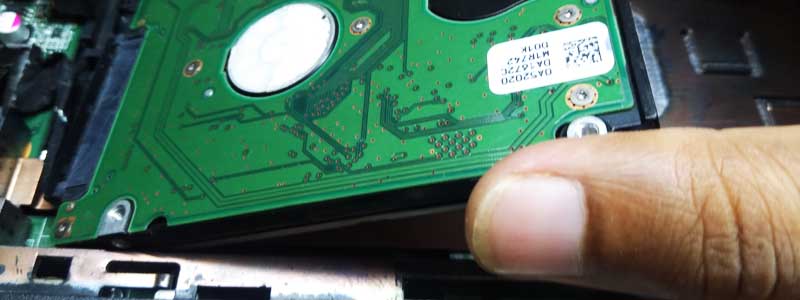
- Unscrew the existing drive and slide it out of its connector. On a 2.5-inch bay it usually pulls sideways out of the SATA connector rather than straight up.
- Transfer the caddy, bracket or rubber rails to the new drive — they set the alignment and hold it against the connector.
- For an M.2 drive, insert it into the slot at roughly a 30-degree angle, press it flat, and fit the retaining screw or clip. Do not force it flat before it is seated.
- Refit the panel, reconnect the battery, and boot. If the machine boots to the old drive or to nothing, check the boot order in firmware — our guide to getting into a laptop’s BIOS covers the key for each brand.
Windows should come up exactly as before, with the same files, settings and applications, and a considerably faster boot. Replacing a storage drive does not affect Windows activation, since the digital license is tied to the machine rather than the disk.
Cloning Without an Adapter Using a Disk Image
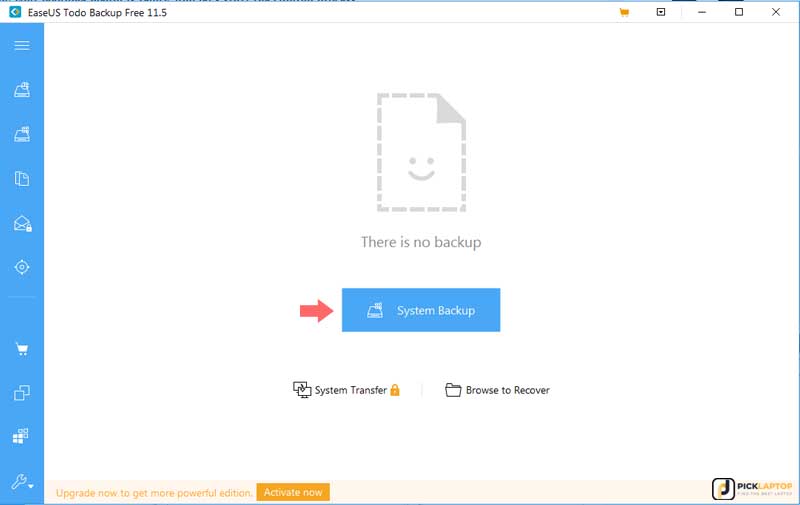
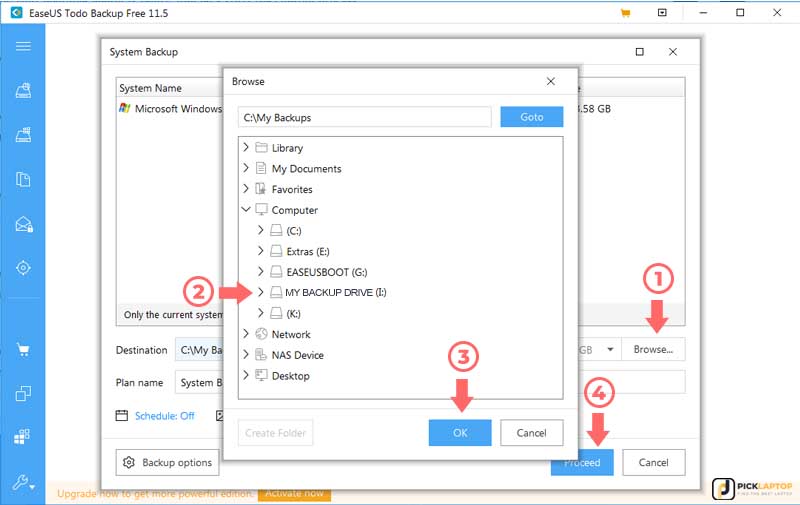
If you have no adapter but do have an external hard drive, you can go via a disk image instead: back the system up to the external drive, swap in the SSD, then restore the image onto it from bootable rescue media.
It takes longer and has more steps that can go wrong, and it requires an external drive large enough to hold the image. In most cases a USB enclosure costs less than the time this route takes.
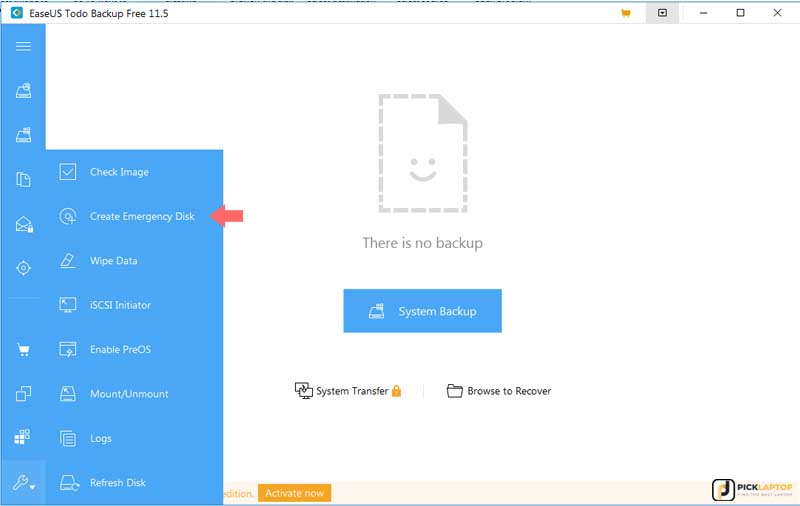
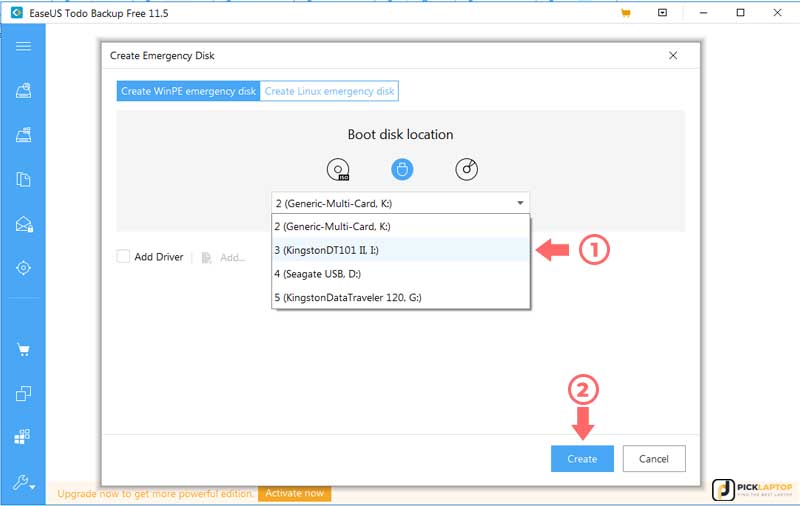
- Create bootable rescue media from your backup tool — most call this a rescue disk, emergency disk or bootable media builder — onto a USB stick.
- Run a full system backup to the external drive, including every partition needed to boot: the EFI system partition, the recovery partition and the Windows partition. Back up your other drives manually as well.
- Shut down and fit the SSD as described above.
- Boot from the rescue USB, leaving the external backup drive connected. Change the boot order in firmware if the machine does not offer the USB device.
- Point the recovery tool at your backup image on the external drive.
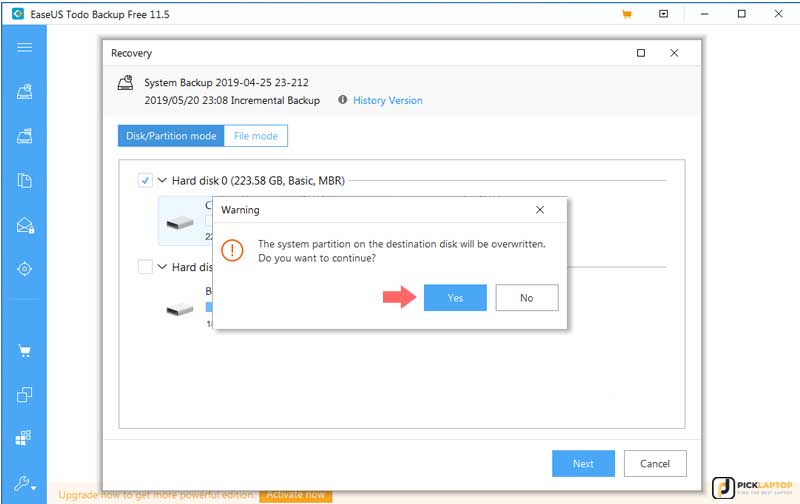
- Select the blank SSD as the restore target and keep the operation in disk or partition mode rather than file mode, so the boot structures are recreated.
- Confirm the overwrite prompt, let it complete, then restart.
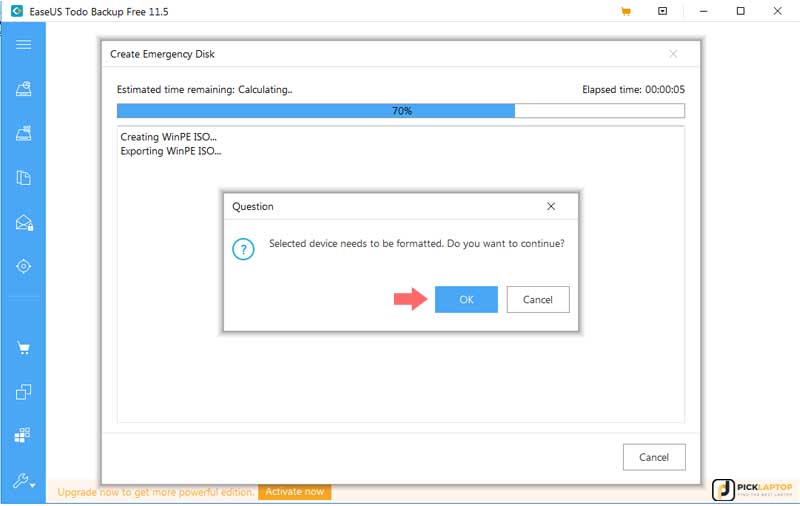
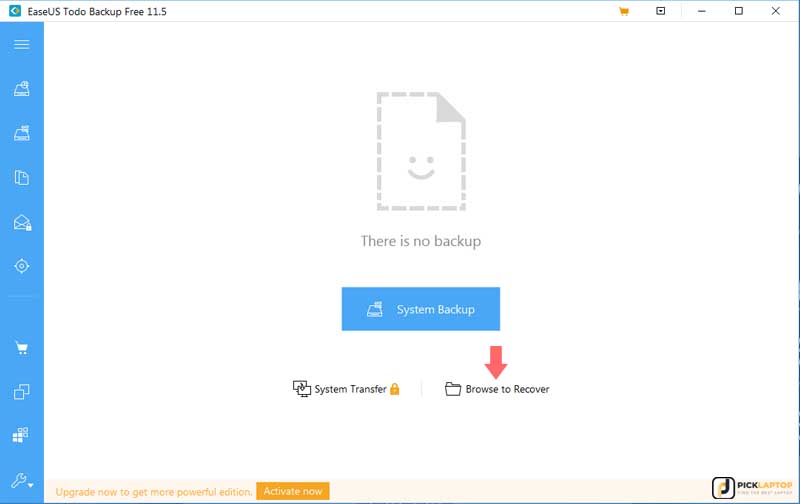
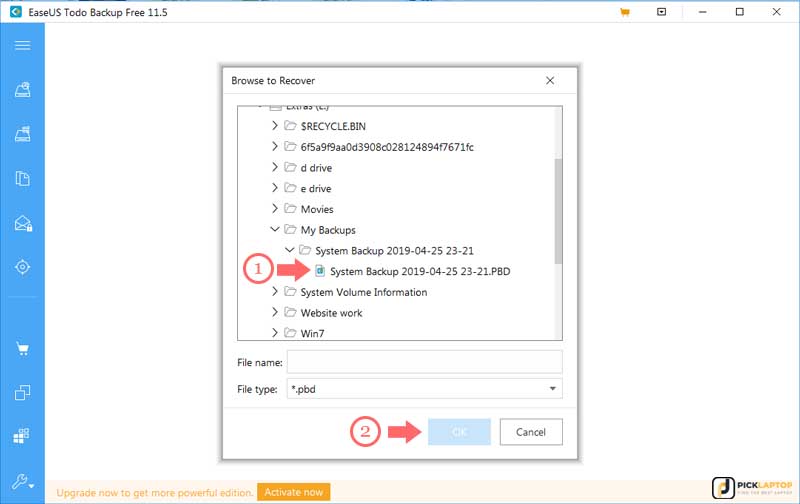
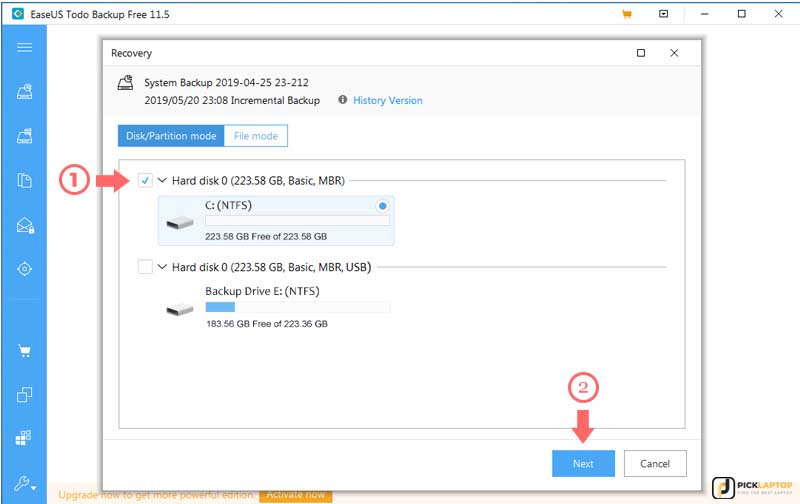
What to Do After the SSD Is Installed
Cloning to a larger drive often leaves the extra capacity unallocated. Open Disk Management, right-click the Windows partition and extend it into the free space so you actually get the capacity you paid for.
Do not defragment an SSD. Windows recognizes solid-state drives and sends TRIM commands instead of running a defragmentation pass, which is why the tool is called Optimize Drives rather than Defragment. Our explainer on what defragmenting does and does not do covers why the old advice does not carry over to flash storage.
If your machine kept its old hard disk in a second bay, wipe it once you have confirmed the SSD boots reliably and use it for media and archives. Verify the SSD works for a week or two before erasing the only remaining copy of anything.
Can any laptop be upgraded to an SSD?
No, and this is the answer that has changed most since 2022. A laptop with a 2.5-inch bay or an accessible M.2 slot can be upgraded. A growing number of thin machines have storage soldered to the board, and those cannot be upgraded at all. Check the service manual for your specific model before buying a drive.
Is my laptop compatible with an SSD?
Check the service manual for your model number, or run a compatibility scanner such as Crucial’s System Scanner. You need the form factor (2.5-inch, M.2 2280, M.2 2230), the interface the socket is actually wired for (SATA or NVMe), and on a 2.5-inch bay the maximum drive thickness — 7mm or 9.5mm.
How do I know if my laptop supports an M.2 SSD?
The service manual lists it, and a teardown photo confirms whether the slot is present and populated. Remember that M.2 is only a form factor: the same slot can carry SATA or NVMe drives, and an M-keyed socket may be wired for one, the other, or both. A SATA card in a PCIe-only socket seats correctly and is never detected.
How do I clone my laptop hard drive?
Connect the new drive externally with a USB adapter or enclosure matched to its type, then use cloning software to copy the internal drive onto it and swap the drives afterwards. Match the enclosure to the drive: a SATA-to-USB adapter will not work with an M.2 NVMe SSD.
What free cloning software still works?
Clonezilla is free and open source and works with any drive brand, though its interface is a text-mode wizard. If your SSD is a Samsung or Crucial drive, the manufacturer supplies cloning software free. Macrium Reflect Free is no longer available — security patches for it ended on 1 January 2024.
Can I move Windows from an HDD to an SSD without reinstalling?
Yes, that is what cloning does — Windows, applications, settings and files all come across intact. Replacing the drive does not affect activation, because the digital license is tied to the machine rather than the disk.
Is a 256GB SSD enough for a laptop?
For everyday use with a modest application set, yes: Windows plus common software fits comfortably and leaves room for documents. It becomes tight with large game libraries, video projects or a big local media collection — for those, either buy more capacity or keep bulk files on an external drive or in cloud storage.
Can you use an SSD and an HDD together in a laptop?
Yes, where the machine has two slots — commonly an M.2 socket alongside a 2.5-inch bay. Windows on the SSD and bulk files on the hard disk is the most cost-effective configuration available while SSD prices are elevated. Optical-bay caddy adapters exist for machines that still have a DVD drive, though they are increasingly rare.
Can I swap hard drives between laptops?
Physically, yes, if the interface and form factor match. Windows will often boot and load generic drivers, but expect to install the correct chipset, graphics and network drivers afterwards. An OEM license stays with the original machine rather than traveling with the disk, so the transplanted installation may need reactivating.
Will an SSD make my old laptop faster?
For boot times, application launches, file searches and general responsiveness, the difference is substantial, because flash storage has no seek latency. It will not raise frame rates or speed up CPU-bound work — an SSD removes a bottleneck rather than adding processing power.
Final Thoughts on Upgrading a Laptop to an SSD
The install is the easy part. Almost every problem with this upgrade comes from buying the wrong drive, so settle the form factor, the socket wiring and the physical clearance from your service manual before ordering anything.
Back up before you clone, check the destination twice, and confirm the new drive is stable for a while before wiping the old one.