
Basic Input Output System (BIOS) is an essential function of any computer or laptop if we want to tweak the system settings, such as changing the clock speed, hard drive settings, boot order, etc.
The primary function of the BIOS is to boot up the system and run the POST(power-on self-test), which helps the system to check the peripherals attached. It is a chip embedded in the motherboard called EPROM (Erasable Programmable Read-Only Memory).
This chip is a type of ROM; it permanently stores the system configuration and invokes this configuration on every system startup before the actual boot process starts. Once we power on the system, it generates the data flow with the help of a POST signal which checks the status of all the hardware attached to the laptops, such keyboard, touchpad, hard drives, etc.
If the BIOS does not sense any error, this will start the system. Still, if it receives an interrupt message from any device such as a hard drive, it immediately halts the system and generates an error like “Hard drive not found” or “No boot device found”.
With the advancement of technology, BIOS has been replaced by UEFI (Unified Extensible Firmware Interface) due to its incapability to handle too much storage capacity. The new firmware is now compatible with both 32 bit and 64-bit architecture and can handle up to 9.4 zettabytes of drives.
Some of the primary functions which a BIOS or UEFI performs are:
- POST: It tests the system’s hardware, from the keyboard to a webcam everything.
- CMOS Setup: Complementary Metal-Oxide Semiconductor contains the low-level information of the system such as password, SATA operations, time and date.
- Bootstrap Loader: Its purpose is to read the hard drive boot sector and load the operating system. It is now replaced with an Extensive Firmware Interface (EFI).
- BIOS Driver: This is used to boot the system and handle basic operational control of the PC or Laptop.
This procedure is Microsoft environment specific and will be valid on devices with Microsoft-based operating systems only, especially for Windows 7.
Before moving on any further, let’s investigate why we need to access the BIOS on laptops such as HP laptops, Dell laptops, etc.
What’s Inside
Why do we need to recycle the laptop?
BIOS is an integral part of the system, as we have already discussed. So, there are various conditions in which we to access it. Some of the reasons are as follows:
- When we want to overclock the processor.
- When we need to change the boot order.
- When we want to enable or disable a drive
- When we want to change RAM speed
- When we want to enable/disable PXE boot on a system
- When we want to check PC health
So, above are some conditions in which we need to access BIOS over laptops.
Procedure:
Accessing BIOS on a laptop is not a complex process, but it still requires some attention; that’s why we need a step-by-step procedure. In this article, we have mentioned each step very clearly.
We can access the BIOS or UEFI on a Laptop by the following methods:
- Accessing the BIOS/UEFI by Hot Key
- Accessing the BIOS/UEFI by Windows settings
- Accessing the BIOS/UEFI via Command Prompt
- Accessing the BIOS/UEFI via Shift + Restart options
We can follow all the methods mentioned above to access the BIOS/UEFI on the Laptop. Now let’s explore the methods one by one:
Method # 1: Accessing the BIOS/UEFI via Hot Key
The most straightforward method of accessing the BIOS is with the help of the Hotkeys. Every laptop manufacturer defines its hotkey. For accessing the BIOS with the use of hotkeys we must follow the below steps:
Step # 1:
Start your system or Laptop with the help of the “Power” button available on the font of the Laptop or desktop.
Step # 2:
Once the start screen appears now, we need to press the hotkey as per the manufacturer’s recommendations
Step # 3:
The following are some keys that need to be pressed to access the BIOS or UEFI on the Laptop.
| Acer | [F2] / [Ctrl] + [Alt] + [Esc] |
| AMIBIOS/American Megatrends | [Del] / [F1] |
| Asus | [F2] |
| Award-BIOS | [Del] / [F2] / [Ctrl] + [Alt] + [Esc] |
| Compaq | [F10] |
| Dell | [F2] |
| HP | [F10] |
| Packard Bell | [F2] |
| Phoenix-BIOS | [Del] / [F2] / [Ctrl] + [Alt] + [Esc] |
| Sony | [F2] |
| Toshiba | [Esc] / [F1] |
Once we have pressed the hotkey mentioned above as per the manufacturer, we will enter the BIOS or UEFI menu right away.
Method # 2: Accessing the BIOS/UEFI by Windows settings
It is another way of accessing the BIOS or UEFI with the help of windows settings. We can use this method in both the operating systems, Windows 8/8.1 and Windows 10. Let’s see the process for both the operating systems individually.
For Windows 8/8.1:
Step # 1:
Go to “Settings”
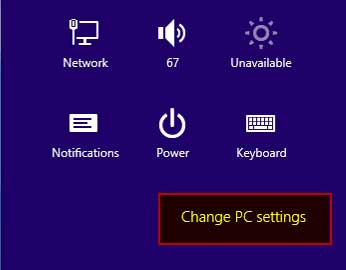
Step # 2:
Click on “Change PC Settings”
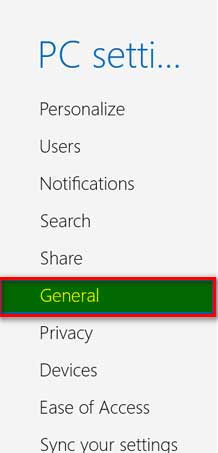
Step # 3:
Select “General”
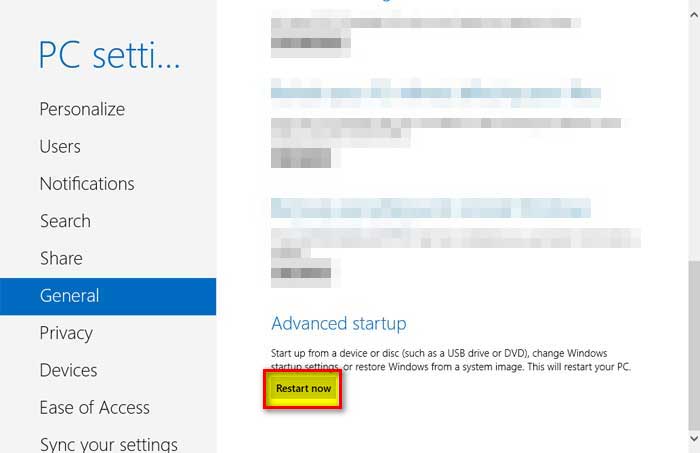
Step # 4:
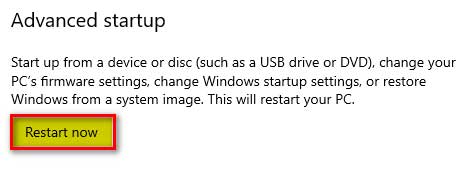
Click on “Restart Now”
Step # 5:
After clicking the restart now button, the windows restart and directly go to the “Advanced Startup” menu
Step # 6:
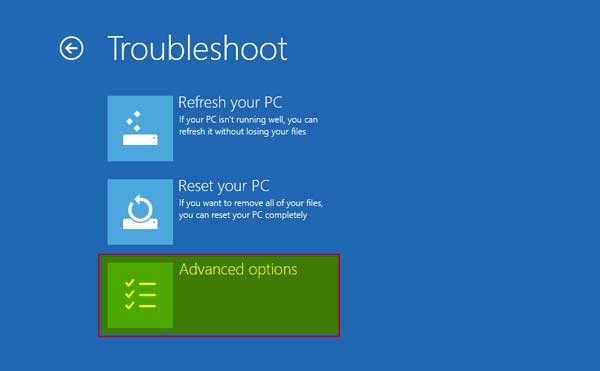
Once we are in the “Advanced startup” option, we will select the “Troubleshoot” option
Step # 7:
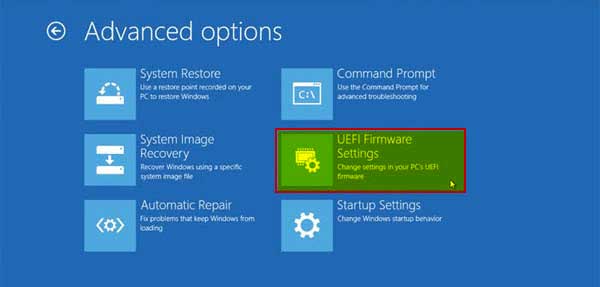
Now form here once again select “Advanced options”, where we will find “UEFI Firmware Settings.”
Step # 8:
Now we are in “UEFI Firmware Settings”, where we can tweak the BIOS, and once we are done, we can restart the system.
For Windows 10:
Step # 1:
Go to “Start” then “Settings”


Step # 2:
Select “Update & Security”

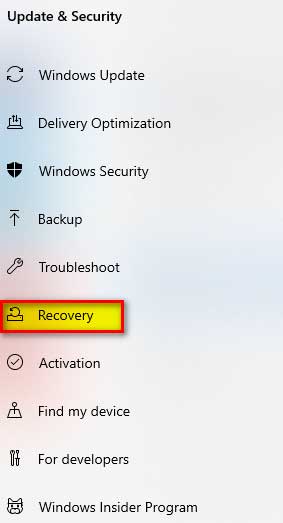
Step # 3:
From the left pane select “Recovery”
Step # 4:
In the right pane, we will find “Advanced startup”, under which we can see the “Restart Now” button
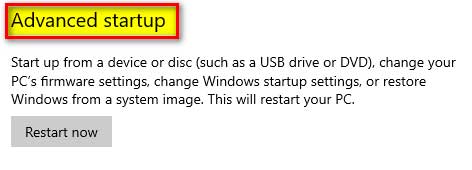
Step # 5:
Click the “Restart Now” button
Step # 6:
Once the system restarts, it will directly take us to the “Advance Startup” option.
Step # 7:
From here, choose “Troubleshoot.”

Step # 8:
Select “Advance options” in “Troubleshoot”

Step # 9:
From “Advanced options” we will select “UEFI Firmware Settings”
Step # 10:
Now press restart to access the BIOS/UEFI to change the settings

Method # 3: Accessing the BIOS/UEFI via Command Prompt
We can also access the BIOS/UEFI settings with the help of command prompt. This is a pretty simple and straight forward method. To invoke the BIOS with this method all we need is to run the command prompt with administrative privileges.
For this we will follow the below steps:
Step # 1:
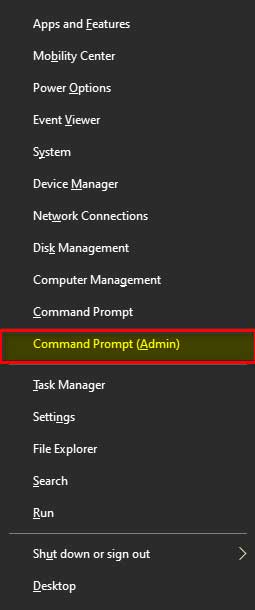
To enter the command prompt press “Windows + R” key and type “CMD”.
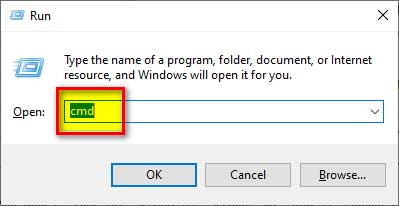
“OR”
Press “Windows + X” keys and select “Command Prompt (Admin)”
Step # 2:
Next, a dialogue box asks for the administrative account credentials.
Step # 3:
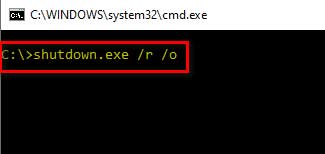
Once we have opened the command prompt with administrative privileges now, we need to enter the following command
C:\>Shutdown.exe /r /o
Where /r parameter is used to restart the system and /o is for entering the advanced boot options after the restart.
Step # 4:
Now windows will prompt us to sign off, and it will reboot automatically.
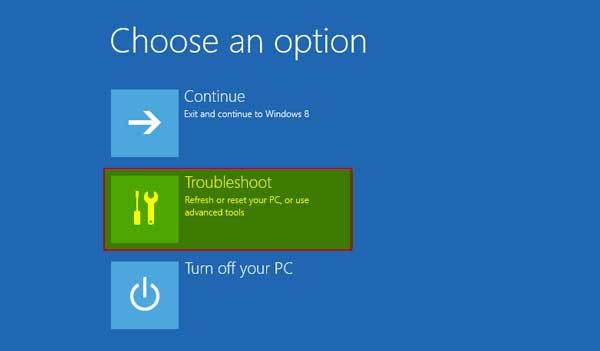
Step # 5:
After the restart, the windows will automatically drive us to “Advanced startup options”, from where we can select “Troubleshoot.”
Step # 6:
After this, all the steps are the same as discussed in the previous method.
Method # 4: Accessing the BIOS/UEFI via Shift + Restart options
It is another method of accessing the BIOS/UEFI in which we even do not require to sign in over the system because it will work as long as we are on the login screen and have access to the restart button.
It is a fast method to access the BIOS. Let’s see the steps to access BIOS with the help of this method:
Step # 1:
Click on the “Shutdown Icon” and select “Restart” while holding the “Shift” button.

Step # 2:
Once we have selected the options, it will take us to “Advance startup” options instead of fully rebooting.
Step # 3:
From here, choose “Troubleshoot.”
Step # 4:
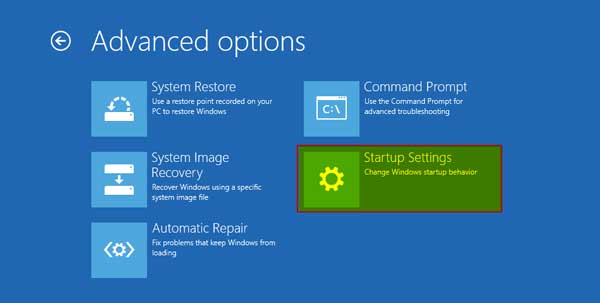
Select “Advance options” in “Troubleshoot”
Step # 5:
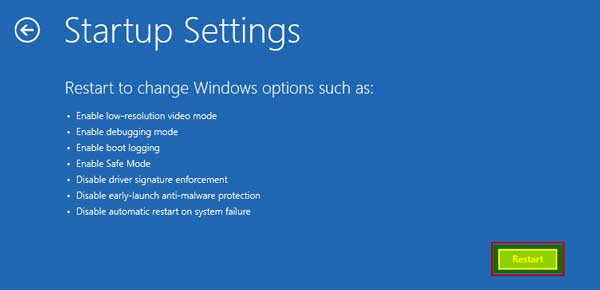
We need to select the “Startup Settings” from all the options to define how Windows starts up.
Step # 6:
Next, it will display all the options we can use on the next restart to select the “Restart” option.
Step # 7:
Next, it will display every option which we can select on the startup with the help of the F1 to F9 keys, but we press the “F10” key for more options
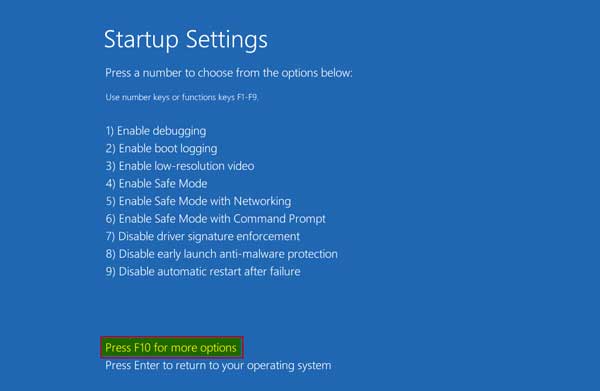
Step # 8:
Once we press the F10 key, it will give us the option of “Launch recovery environment” to press the F1 key.
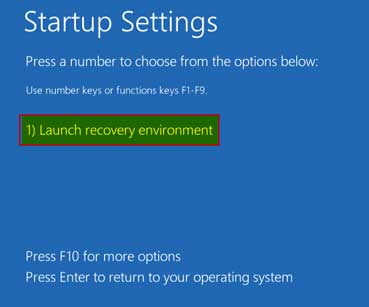
Step # 9:
Once we have successfully accessed the “Recovery environment” which is an extra option now, we can change any BIOS/UEFI setting.
Closing Statement:
This article has covered all major points to access the BIOS/UEFI on a laptop. In our opinion, the best way of accessing it is with the help of a Hotkey. We can select the second option by pressing the restart with the shift key.
References:
- How to Get into BIOS in Windows 10 – BIOS Setup PC Guide (freecodecamp.org)
- Accessing BIOS | How to enter BIOS configuration – IONOS
- How to Enter the BIOS on Your Windows 11 PC (howtogeek.com)
- How do I enter BIOS on Windows 10? – Microsoft Community
- How to Access/Enter BIOS from Windows 10 Settings or Command Prompt – All Things How
- How to Enter BIOS Setup on Windows PCs | HP® Tech Takes