Defragmentation or defragging is the process of arranging files over the hard drive. In this process, all the related data is assembled constantly so that the drive access it quickly.
If we want to understand the defragmentation process, we should understand the fragmentation behavior of the system first. So, what is fragmentation?
Fragmentation is the disability of the system to allocate the contagious space to store a file as a single unit. Fragmentation occurs when we create a file, save it, and after some time, we reaccess it for appending some data. The file is stored in many blocks and spread over the hard drive in this whole activity. Eventually, over time read & write speed of the hard drive slow down and experience sluggish performance.
To address this issue, we have a defragmentation process. This process moves the blocks of a file and merges them into one. In this process, the data first moves on the disk’s free space, and once there is enough space available, the data transfers back to its original place where it is supposed to be.
So, it is highly recommended to run disk defragmentation once in a while when our system gets old. This article will discuss a step-by-step procedure to defragment a laptop.
But before moving on to the procedure, we should know why we need to defrag a laptop.
Note: This procedure is Microsoft environment specific and will be valid on devices with Microsoft-based operating systems only.
What’s Inside
- 1 – Why and when do we need to defragment a laptop?
- 2 – Procedure:
- 3 – Method # 1: With the help of the command prompt
- 4 – Method # 2: With Windows Defragment and Optimize Drive (Win8/10)
- 5 – Method # 3: Disk Defragment in Windows 7
- 6 – Method # 4: With the help of third-party software
- 7 – Bonus Method: What if your laptop has an SSD?
- 8 – Closing Statement:
Why and when do we need to defragment a laptop?
As we have already discussed, what is fragmentation? how do we deal it with the help of the defragmentation process? Now let’s explore various reasons which we need to defrag a laptop:
- When the system starts behaving sluggishly.
- When we add a new program
- When we want to increase the hard drive performance
- When we want to access our files quickly.
- To increase the lifespan of the drive.
So, above are some issues due to which we need to defragment the laptops.
Without wasting a single moment, let’s explore all the possibilities of fixing the issue of fragmentation and see how to defragment a laptop?
Procedure:
There are several ways of performing a defragmentation process on a laptop, which totally depends on our convenience. In this article, we will try to discuss each step by step.
Following are the remedial actions that we will take while solving the fragmentation problem on the laptop:
- With the help of the command prompt
- Defragmentation with windows Defragment and optimize drive(windows8/10)
- Defragmentation with disk defragment in windows 7
- With the use of third-party software
Method # 1: With the help of the command prompt
It is the most straightforward method to defragment a partition.
Let’s go with the following steps:
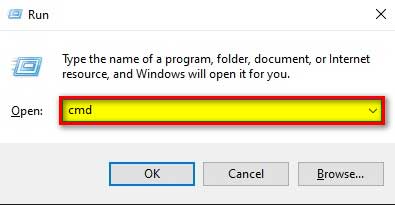
Step # 1:
Go to “Run” by pressing Windows + R button on the keyboard
Step # 2:
Type “cmd” and press “Enter key”
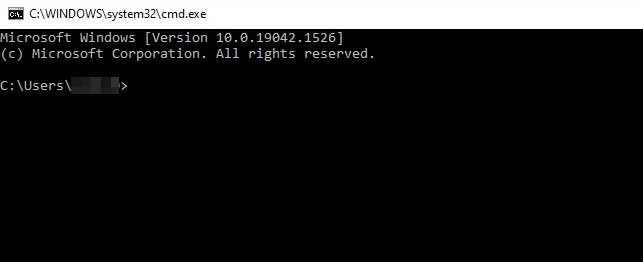
Step # 3:
A new window of “Command Prompt” will open
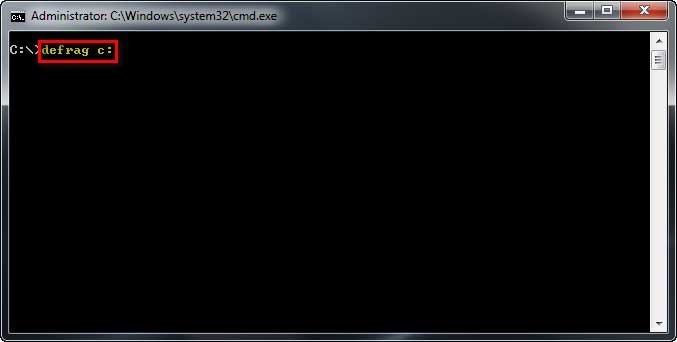
Step # 4:
From here, we will type the “defrag <drive letter>” and press “Enter.”
Step # 5:
This will take some time to complete
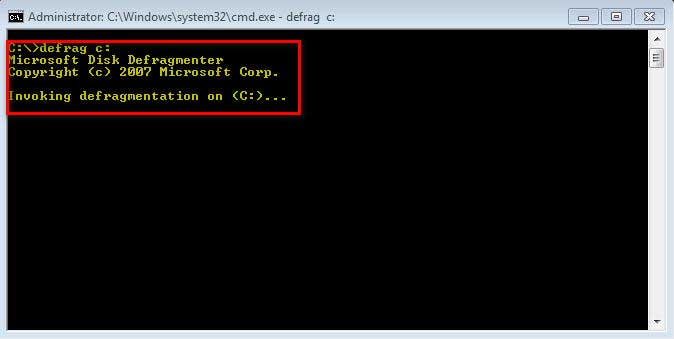
Step # 6:
Once the process starts it will show the volume information

Step # 7:
When the process completes, it will display the total defragmented space with other volume information.
Note:
While performing this option, always use the “Administrator” account.
Method # 2: With Windows Defragment and Optimize Drive (Win8/10)
If we have windows 8 or 10 and want to perform defragmentation on the hard drive, windows provide a built-in utility for the “Defragment and Optimize Drive” option. This app offers us a distinct option of analyzing our hard drive whether the hard drive requires defragmentation or not.
As seen in the steps of performing defragmentation via command prompt, analyzing the hard drive option was not present. So, with the windows built-in app, we have this leverage.
To perform defragmentation with this utility, we will go with the following steps:
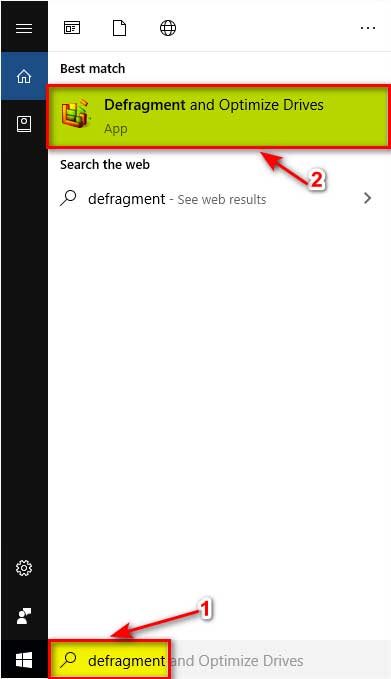
Step # 1:
Press “Start” and type “defragment” in the search option.
Step # 2:
This will show us the “Defragment and Optimize Drive” option, which we need to select.
Step # 3:
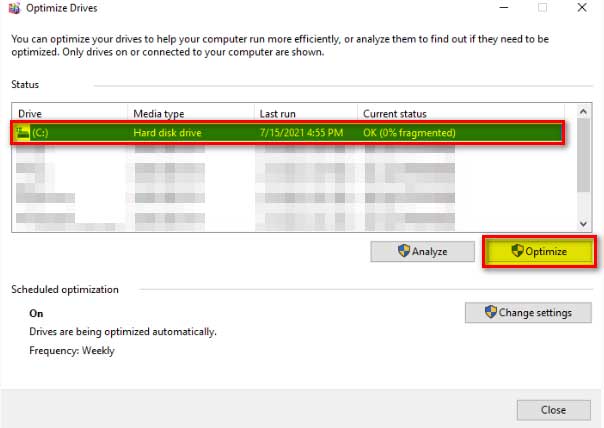
Once we have selected the “Defragment and Optimize Drive” option, it will open the “Optimize Drive” window.
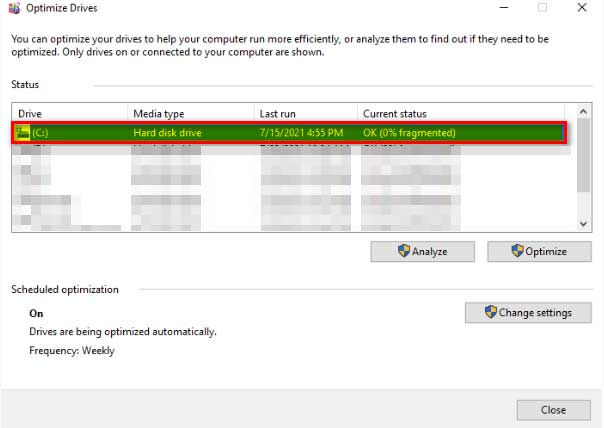
This will show all the drives on which we can perform defragmentation and optimization.
Step # 4:
From here, we will select the drive as per the current status option. (For example, we will select C drive)

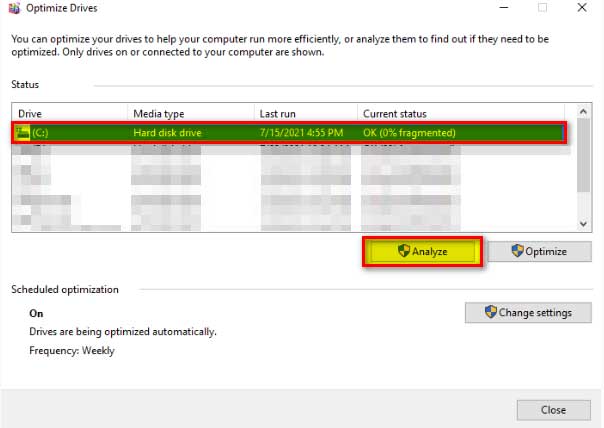
Step # 5:
We can select “Analyze” or the “Optimize” options. But the recommended option is to go with the “Analyze” to have the actual picture of the hard drive that how many fragmented blocks are available, and how badly this partition is required to be defragmented.
Although this will double the optimization time as the system goes into analyzing process, we will perform the optimization process.
Step # 6:
Once the analysis process is completed, we will go for the optimization. For this, we need to select the “Optimization” option.
Method # 3: Disk Defragment in Windows 7
If we have a windows 7 pc and we want to defragment the Laptop, then we will follow the below procedures.
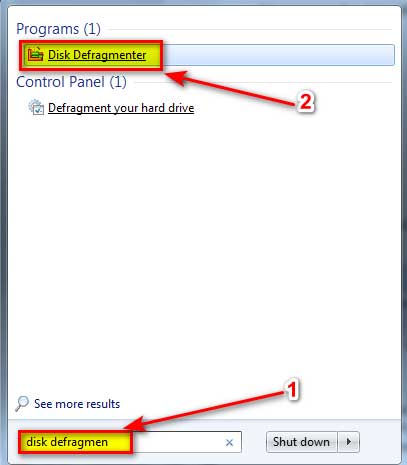
Step # 1:
We can go to the disk defragment utility in a couple of ways. First, go to the “Start” menu, then type “Disk Defragmenter”
OR
- Go to “Computer,” right-click on the partition, and take its properties
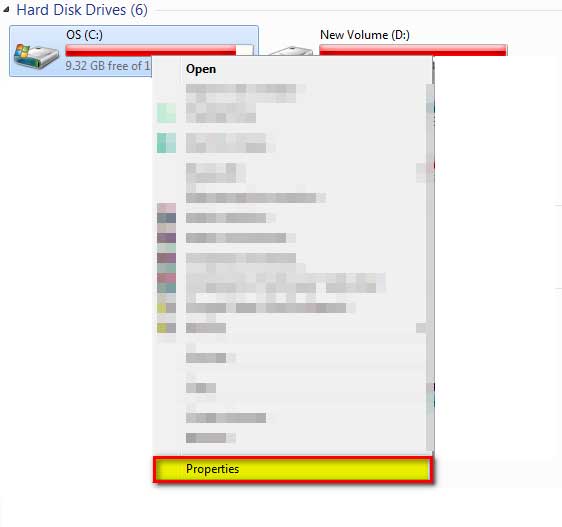
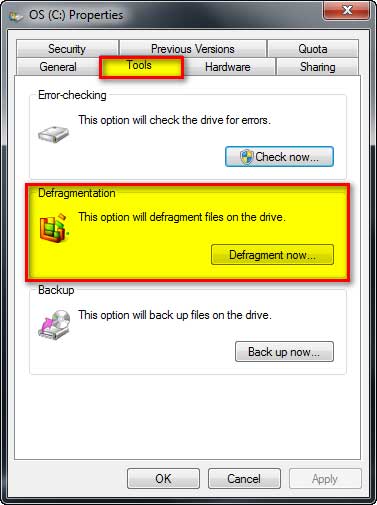
- Select “Tools” under this tab; we have a defragmentation option
OR
- Right-click on the “Computer” icon and select “Manage” to go to computer management

- Now in computer management, select “Disk Management,” and from here in the right-hand pane, right-click on any disk partition.
- Take its properties, and select “Tools” under this tab; we have the “Disk Defragmentation” option.
Step # 2:
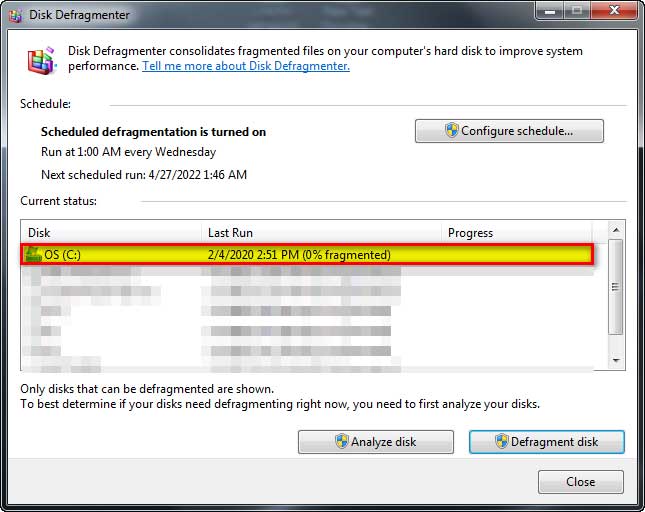
Now we will select the “Defragment Now” option. This will open below window

Step #3:
Once we have reached here, we will select the drive as per the current status option. (For example, we will select C drive)
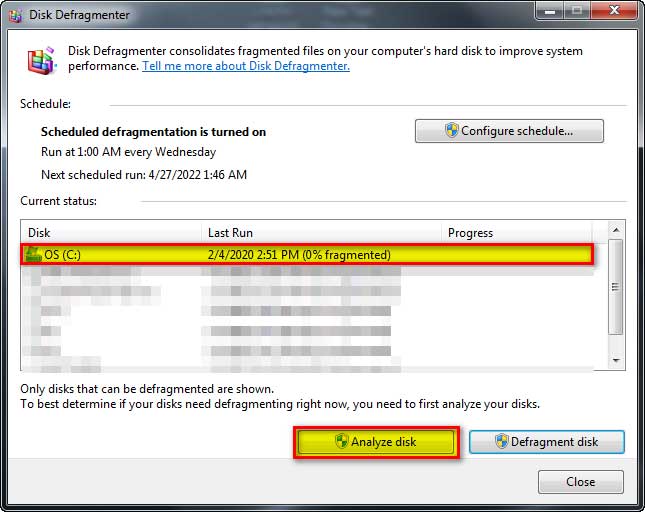
Step # 4:
We can select “Analyze” or the “Optimize” options. But the recommended option is to go with the “Analyze” to have the actual picture of the hard drive that how many fragmented blocks are available, and how badly this partition is required to be defragmented.
Although this will double the optimization time as the system goes into analyzing process, we will perform the optimization process.
Step # 5:
Once the analyzing process is completed, we will go for the defragmenting of the disk. For this, we need to select the “Defragment Disk” option.

Note:
Windows also provides us the leverage of scheduling our defragment process; all we need to do is select the “Configure Schedule.”
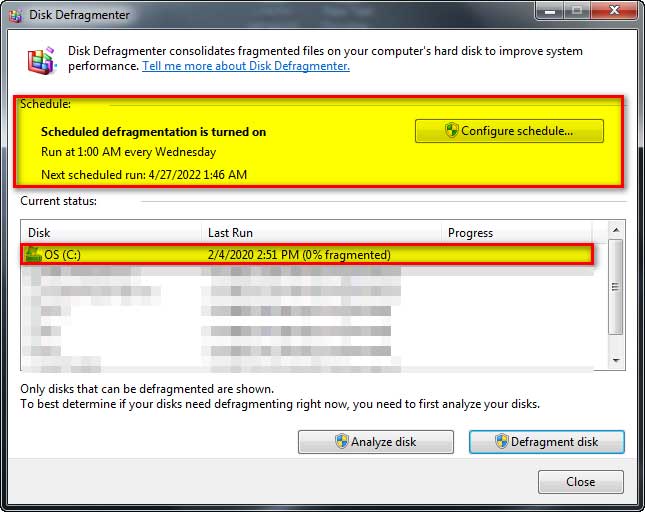
And from here we can schedule the next defragmentation
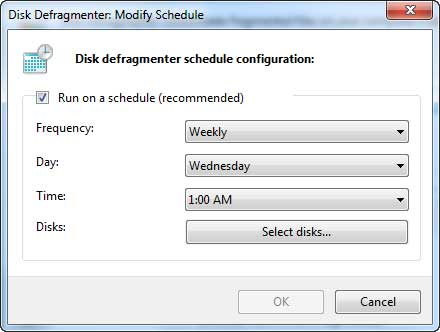
The scheduling window provides us following options:
- Frequency: Here, we can plan the number of occurrences of defragmentation activity, such as Daily, Weekly, and Monthly
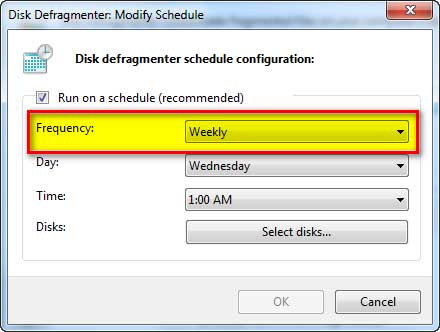
- Day: This option allows us to select the day on which defragmentation will perform in case of weekly or monthly frequency selection
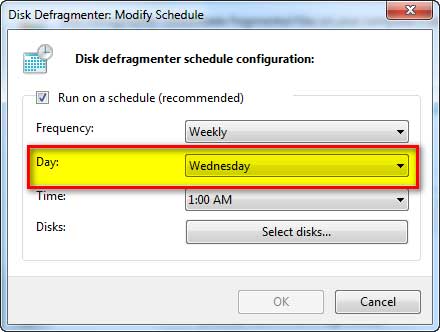
- Time: With this option, we can define the time of defragmentation
- Disk: In this option, we can select the partition or the disk on which we want to perform the disk defragmentation.
Method # 4: With the help of third-party software
We have discussed the in-built windows utilities for disk defragmentation, but to provide us ease, we have third-party software that can perform this activity all their own. We need to download and install this software, and the rest will be done by them.
For this purpose, we have a couple of software which we can use to defrag the laptop. The following is the list of the software:
- AOMEI Partition Assistant Standard
- Defraggler
- Avast Cleanup
There is much other software available over the internet, but we have selected and provided the best solution.
Bonus Method: What if your laptop has an SSD?
In the above sections, we have talked about laptops with HDDs. But what if we have a laptop with an SSD. Various question arises here.
- Do we need to perform the defragmentation over an SSD?
- Is it safe to defragment an SSD?
- Why should we not perform the defragmentation over an SSD?
So, Solid State Drive or an SSD is a specialized hard drive known for its fast read and write operations. We use the defragmentation process on a hard drive to speed up the reading and writing process of HDD by exploiting the free blocks over the platter.
But in the case of SSD, no such platter or any moving object is present, so it is totally unnecessary to perform the defragmentation over the SSD. Infect this activity will damage the SSD drive, as the SSD can read the data spread over different blocks or they are next to each other.
Closing Statement:
In this article, we have tried to embed everything that can help us defragment a laptop. We can use any of the above methods as per the requirement. Although we have third-party software available to defrag the laptop, performing this activity with a built-in windows utility is highly recommended. It will minimize the risk of any unintended or unforeseen condition (Many software provides SSD defragmentation, which is not recommended).
I hope the readers find this article interesting, Informative, and engaging.
References:
- Ways to improve your computer’s performance (microsoft.com)
- What Does a Disk Defrag do and Why Do I Need it? (diskpart.com)
- What Does Defragging Do? | HP® Tech Takes
- How to Defrag Windows 7: 10 Steps (with Pictures) – wikiHow
- How To Defrag Windows 7 From The Command Line | Pluralsight
- Download Defraggler for free | Defrag SSD and HDD drives (ccleaner.com)
- Avast Cleanup | Tune Up & Speed Up Your Windows PC